This article explains which steps you and your payroll accountant need to take to authorize and set up the relevant Datenservices. Read below how you can successfully set up the integration with DATEV.
DATEV integration includes the following features that you can activate:
|
Lohnimportdatenservice Personio → DATEV |
Lohnauswertungsdatenservice DATEV → Personio |
Automatic eAU retrieval Personio ↔ DATEV |
|
|
|
For more information, see our Help Center articleOverview of DATEV integration.
Before you get started
Activate and set up your account
Your Personio account needs to be configured to allow you to send confidential data from Personio to DATEV from your Personio account to the DATEV payroll application. Please speak to your implementation manager or go to Support and contact our service team. The integration will then be activated for you, and additional payroll attributes will be added to your account.
Grant access rights for setup and use
The person responsible for your payroll accounting needs to have access rights to be able to set up and use the DATEV integration. You can manage permissions in Personio as follows:
- Go to Settings > Roles & Permissions.
- Select an existing employee role from the list or create a new employee role.
- Switch to the Permissions tab.
Read below to find out which access rights you need to assign:
Set up the integration
| Access Rights | Set up integration as | See the integration setup in Personio |
| Payroll | Editing rights for the relevant legal entity. | Viewing rights for the relevant legal entity. |
| Account configuration > Payroll | Grant editing rights to everyone. | Viewing-only rights are not available here. |
Use integration
| Access Rights | Create a DATEV export and request and distribute payroll documents | Download created DATEV exports and payroll documents |
| Payroll | Editing rights for the relevant legal entity. | Viewing rights for the relevant legal entity. |
For more information on permissions in Personio, see our article on Permissions.
Steps for your accountant
If you have ordered the DATEV integration from Personio and want to transmit data from Personio to your payroll accountant's payroll software, prior authorization is required. The steps that your payroll accountant needs to complete are in the article Best Practice Payroll Process with Tax Advisors: Setting up and accounting with the DATEV integration.
Once your accountant has completed the necessary steps, you can get started with setting up and authorizing Datenservices.
Configure the general settings
Why are general settings important?
The general settings are necessary to authorize the DATEV Datenservices and use the DATEV integration. DATEV identifies Personio users by their Advisor and Tenant ID. You receive these from your payroll accountant. Without this allocation, you cannot transfer any data from Personio to DATEV (Lohnimportdatenservice), nor any documents from DATEV to Personio (Lohnauswertungsdatenservice).
Set up the general settings
Follow these steps to set up the general settings:
- Go to Payroll > Manage > DATEV LODAS/Wages and Salaries in the General Settings area.
-
If you have activated subcompanies, select the appropriate subcompany at the top.
Please note:
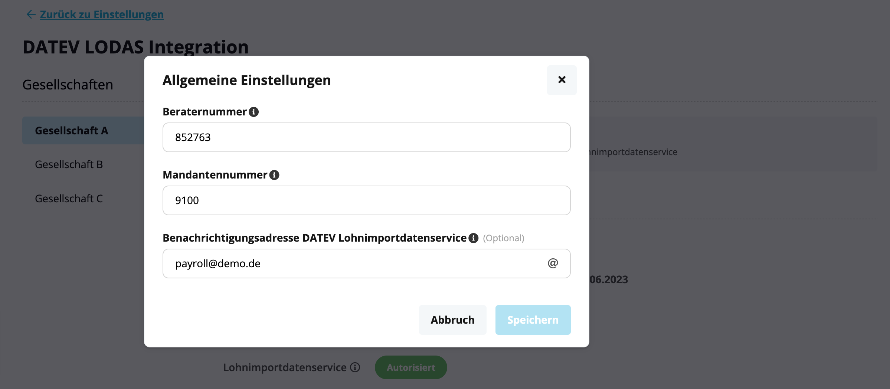
When you add a new legal entity, it will not appear in the list at first. To activate DATEV integration for another company, please contact our customer support team. Our team can activate this option for you. - Then click on the pencil icon on the right and enter the following information:
▶︎ Advisor number: This must consist of 4–7 digits.
▶︎ Tenant number: This must consist of 1–5 digits.
▶︎ DATEV Lohnimportdatenservice Notification Address : Your payroll accountant will receive a monthly notification via this email address whenever a DATEV export from Personio is sent to DATEV.
▶︎ LuG tenants: For DATEV Lohn & Gehalt, the first payroll month of the LuG tenant must also be entered in the settings. - Next, click on Save.
Once the general settings have been saved, you can continue with the authorization of the DATEV Datenservices.
Authorize Datenservices
Authorization requirements
- The corresponding DATEV data service (wage import data service, wage evaluation data service, wage exchange data service for eAU) was ordered for you as a customer by the person responsible for your payroll accounting via the MyDATEV client registration.
- The access rights for the DATEV Datenservice in question were enabled by the person responsible for your payroll accounting on the SmartLogin/SmartCard.
- You have saved the General Settings in Personio.
Authorizing the DATEV integration
Authorization in Personio
Once the DATEV-Datenservices have been activated for you, you need to authorize Personio to import and export documents on your behalf via the interface. Export documents on your behalf via the interface.
To do so, please perform the following steps:
- Go to Payroll > Manage > DATEV LODAS/Wages and Salaries.
- Under Authorization DATEV-Datenservices, click the button Start authorization process for each company you wish to authorize.
- Select the interface you wish to authorize in the next window, read the information provided and click on Proceed to complete this step.
- A new tab opens with the DATEV login page where you can complete the authorization. To continue, refer to the next point Authorization in DATEV.
Please note:
This step and the setup by the person responsible for your payroll accounting need to be done separately for each company. In general, each subcompany in Personio should correspond to a tenant in DATEV. Entering the same combination of Advisor ID and Tenant ID for several subcompanies is not recommended and should only be considered under special circumstances.
Authorization in DATEV
After starting the authorization process in Personio, the DATEV login page opens in a new tab. To log in, you will need to be able to authenticate yourself with DATEV, such as with a DATEV SmartLogin, SmartCard or mIDentity. Then follow these steps:
- Log in with your access data and two-factor authentication.
- Confirm the authorization to enable Personio to transmit data to and retrieve data from the DATEV data center.
- A confirmation page will be shown once you have approved the required authorization.
Checking the Authorization Status
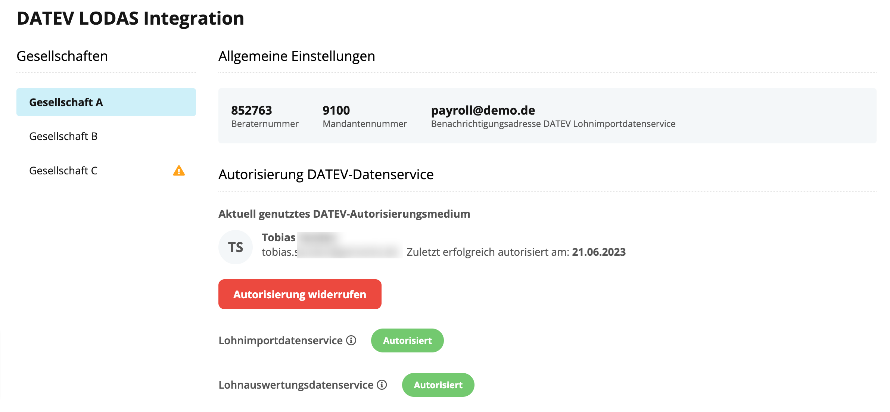
You can see whether and by whom the DATEV data services have been authorized under Payroll > Manage > DATEV LODAS/Wages and Salariesin the DATEV Data Service Authorization section. The following information is displayed:
- Name and email address of the person whose authorization medium was used.
- The date on which the authorization was made.
- Which data services are authorized (wage import data service, wage evaluation data service, eAU retrieval service).
Please note:
Note that authorization only needs to be provided once for each interface. The link for launching the authorization process therefore only appears if the authorization has not yet been provided.
Revoking Authorization
You can remove the link between your Personio account and the account of the person responsible for your payroll accounting by revoking the authorization. This involves the following steps:
- Navigate to Payroll > Manage > DATEV LODAS/Payroll.
- In the DATEV-Datenservice authorization section, click the button Revoke authorization.
- Click on Revoke authorization and confirm.
Please note:
Revoking authorization automatically affects both DATEV-Datenservices, and the link is removed immediately. If you would like to restart the authorization, you can carry out the process described above again at any time.
Set up the Lohnimportdatenservice
What Is the Lohnimportdatenservice?
The payroll import data service supports the process of carrying over master data, absences, fixed salaries, hourly salaries, one-time and recurring compensation from your Personio account to the DATEV payroll accounting program.
The confidential data is provided via a secure connection in the DATEV data center for LODAS and Lohn und Gehalt. Data from Personio can be uploaded to the payroll application and used for the next payroll run at the click of a button.
Set up the Lohnimportdatenservice
All settings for the payroll import data service can be configuredunder Payroll > Manage > DATEV LODAS/Payroll. This includes selecting the data to be exported and assigning the compensations to a DATEV salary type.
Learn more about transferring master data, time off, fixed salaries, hourly wages, one-time and recurring compensations with the Lohnimportdatenservice. For further information, see the article Overview of Transferred Employee Master Data.
Set up the DATEV Lohnauswertungsdatenservice
DATEV Lohnauswertungsdatenservice – What Is It?
Personio's Lohnauswertungsdatenservice allows you to directly access and import the documents that your payroll accountant has released in DATEV LODAS or Lohn und Gehalt. The confidential documents are retrieved from the DATEV data center via a secure interface and stored on the Personio server. You can retrieve them from there, and so can your employees, if you so choose.
Set up the DATEV Lohnauswertungsdatenservice
Select the documents to be imported
Select the documents that are relevant to your company. To do this, follow these steps:
- Navigate to Payroll > Manage > DATEV LODAS/Wages and Salaries.
- Select the relevant sub-company.
- Go to Lohnauswertungsdatenservice > Settings and activate the transfer of all the documents you require from the Employer Documents and Employee Documents categories. Use the preview button to view sample documents.
- Click Save.
Once retrieved from DATEV, the documents selected in this step will be available under Payroll > Documents in the spreadsheet of the respective month. For further processing of the documents, please also read our article Importing documents via the payroll evaluation data service.
Note
Note that only documents your payroll accountant has released to you will be shown as available for selection. The info document explains how your payroll accountant can share documents with you in DATEV LODAS or Lohn und Gehalt. 1022662.
Documents available for import
A list of documents that are available for transfer from DATEV is shown below. They are subdivided into employer and employee documents. Information on the reason for their creation, explanatory information, and abbreviations are also shown. You can find examples of each document type in the table as well as download links using the abbreviations on the right.
Tip:
In Personio, you can also access these sample documents under Payroll > Payroll > DATEV LODAS/Wages and Salaries in the Payroll Evaluation Data Service - Settings for Employer and Employee Documents section by clicking the Preview button.
| Personio name | Basis for creation | Explanation | Abbreviation |
| cash payout values | monthly | Overview of cash payments from payroll to employee. | ZABR |
| contribution report | monthly | Proof of social insurance contributions paid for submission per health insurer and per company. | KBNW |
| Contribution report (explanation) | monthly | Proof of estimated and actual social insurance contributions from payroll if contribution statement is not submitted on time. | SBNW |
| booking receipt | monthly | Overview of all wage costs prepared as a posting record for transfer to financial accounting. | BUBE |
| loan values | Monthly/subject to conditions | Overview of loan values per employee and per loan (e.g. recipient, total debt, repayment, residual debt). | DAWE |
| Transfers (DÜ protocol) | monthly | Data transmission protocol for payments to employee, tax authorities and health insurer. | PRZA |
| cost center values | monthly | Relevant for financial accounting: Statement of costs per cost center. | COST |
| cost unit values | monthly | Relevant for financial accounting: Statement of costs per payer. | KOTR |
| Wage type values | monthly | Simple statement of costs per salary type. | LOWE |
| Wage type values (extended) | monthly | Statement of costs per salary type, supplemented by apportionment and other employer costs. | LOPN |
| payroll journal | monthly | Compilation of data on individual wage costs per month, sorted by employees. Overview of all company employees. | LOJO |
| Payroll journal (individual list) | monthly | Compilation of data on individual wage costs per month, sorted by employees. Overview of all company employees. | LOJE |
| Payroll journal (individual listing) | monthly | LJOE | |
| Income tax registration (DÜ protocol) | Monthly/quarterly/annually | Proof of tax amounts paid for submission to tax authorities per company. | LSTA |
| Personnel cost overview | monthly | Overview of costs for personnel. | LOPS |
| Personnel cost overview | monthly | LOPE | |
| personnel report | monthly | Graphic showing personnel costs, personnel structure and employee retention. | LORE |
| seizure values | Monthly/subject to conditions | Overview of garnishment values per employee and per garnishment (e.g. recipient, total debt, repayment, residual debt). Distinction between ordinary and maintenance garnishment. | PFAN |
| Payments (health insurance) | monthly | Overview of payments to employee, tax authorities and health insurer. | ZAKF |
| overpayments | monthly | Statement of overpayments. (Overpayment = in the case of a retrospective change to the previous month's payroll, individual cases can arise where an employee has been paid more than they were entitled to.) | ZAUW |
| Credit balance per employee | Monthly/subject to conditions | Overview of credit balances in semi-retirement and working lifetime account models per employee. | WEAN |
| Personio name | Basis for creation | Explanation | Abbreviation |
| A1 certificate | Ad hoc | Confirmation by the relevant authority of the registration of an employee who is working abroad within Europe. | ABEG |
| A1 certificate (application confirmation) | Ad hoc | Application to register an employee who is working abroad within Europe with the social insurance authorities. Recipient: relevant authority | AANB |
| payslip | monthly | Overview of an employee's gross and net earnings and master data per month (remuneration statement). | LOBN |
| payroll account | monthly | Overview of all earnings subject to tax and social insurance per employee, including employer's contributions, UV values (UV: Accident insurance) and created DEÜV contribution statements (DEÜV: Data Collection and Transmission Regulation). | LKTO |
| wage tax certificate | End of year/specific event | Proof of remuneration received by an employee, including income tax and social insurance contributions (per employment period/year) in the income tax return for submission to the tax authorities. | LSTB |
| Income tax certificate (English) | End of year/specific event | LSTE | |
| employee master data | monthly | Saved master data in the DATEV system (name, address, health insurer, etc.) per employee. | PDAT |
| social security certificate | End of year/specific event | Proof of social insurance registration (entry/exit/change of health insurer, etc.). | SVNW |
Set up the automatic eAU retrieval via the DATEV integration
How does eAU retrieval work?
With eAU retrieval, Personio automatically retrieves the eAU from the statutory health insurer via the DATEV integration and saves it in Personio whenever a time off request is made due to illness. Both HR Management and the employee will be informed every time its status is updated. This fully automates the eAU process. Find out more about automatic eAU retrieval.
The eAU request is sent regardless of the duration of the requested time off. This ensures that the eAU can be requested even if time off have been entered incorrectly, and the time off can be adjusted by HR Management. The eAU is retrieved as soon as at least one day in the entered time off overlaps with the eAU period.
Note
If an absence that has already been entered is changed, another eAU query is initiated. A time off can therefore be covered by multiple eAUs.
Tip:
Time off recorded in hours can also be considered in the eAU process. To do this, go to Settings > Time Off & Attendance > Absences, and set "Certificate for absence" to "Required" in the time off policy.
Conditions for eAU retrieval
The eAU is only available for employees with statutory or another (non-private) type of health insurance. Employees with private health insurance should continue to follow the usual process of uploading their medical certificates manually.
For the eAU to be retrieved for the correct time off, the following criteria must be met for employees and time off.
| Employees who meet the following criteria will be considered for eAU retrieval |
|
In addition, the eAU is only requested when entering certain time off periods.
| Time off periods that meet the following criteria are considered for the eAU process |
|
Set up eAU retrieval
Setup in DATEV
In order to set up automatic eAU retrieval, the person responsible for DATEV must complete the following steps:
Step 1: Ordering the Lohnaustauschdatenservice
As with previous DATEV data services (e.g., the payroll import data service), you must also order the service in order to use it:
- Go to the MyDATEV Mandantenregistrierung.
- Book the payroll exchange data service.
Step 2: Configuring eAU access rights
After ordering the wage exchange data service, you can now configure the access rights:
- You need to enable access to the Lohnaustauschdatenservice on your Personio client's SmartLogin/SmartCard.
- If you use the DATEV Lohn und Gehalt integration, you need to complete additional steps in DATEV to set up the access rights. See this DATEV Helpcenter article for all relevant information.
Setup in Personio
Once the setup in DATEV is successful, you need to complete the following steps in Personio:
Step 1: Fill in the Type of health insurance attribute
Only employees with statutory health insurance are eligible for eAU retrieval. The system recognizes this from the Type of health insurance attribute.
- Fill out the mandatory attribute Type of health insurance for all employees.
Step 2: Authorize the eAU functionality in Personio
After the Lohnaustauschdatenservice has been ordered and set up in DATEV (see above), the eAU functionality can be authorized in Personio. Follow these steps to authorize the Lohnaustauschdatenservice:
- Navigate to Payroll > Manage > DATEV LODAS/Wages and Salaries.
- Under Authorization DATEV-Datenservices click the button Start authorization process.
- Activate eAU retrieval (Lohnaustauschdatenservice) and click on Proceed.
Step 3: Activate the eAU functionality
To activate automatic eAU retrieval in Personio, follow these steps:
- Navigate to Payroll > Manage > DATEV LODAS/Wages and Salaries.
- Under eAU retrieval (wage exchange data service) – Settings, check the box next to Active.
Use of features
Next Steps
You have successfully set up DATEV integration and can now carry out your monthly payroll easily and automatically with. For a detailed description of how monthly payroll accounting works with DATEV integration and which steps you need to go through to send and receive data from Personio to DATEV, read our Help Center article Monthly Payroll in Personio with DATEV Integration.