We're retiring Personio Conversations and transitioning all customers to the Personio Assistant. The Personio Assistant uses the latest AI technology to help employees find answers and reduce HR tickets.
Conversations remains available until 30 June 2026, or your renewal date, whichever comes first. We’ll remove access after that date. The Personio Assistant is included at no additional cost.
This article explains how to implement Personio Conversations. You will learn how to add Conversations to your Personio plan and how to set up the necessary steps in order to use Conversations.
Step 1: Add Conversations to your plan
To add Conversations to your plan, you can manage your Personio plan yourself or contact your Account Manager.
Step 2: Access Personio Conversations for the first time
Initial setup
The Personio Administrator at your company will first need to create a “Conversations Expert” employee role in Personio and define the appropriate permissions. Administrators have access to this role by default and therefore do not need to assign the role to themselves.
If someone else at your company is responsible for driving the implementation, then the Administrator will need to assign them the role. This person will closely collaborate with Personio during the setup process. This person will be your first expert and should perform the tasks listed below.
Note:
To activate Personio Conversations for the first time, the Administrator must click on the Conversations section in the main navigation bar in Personio. This will complete the initial setup.
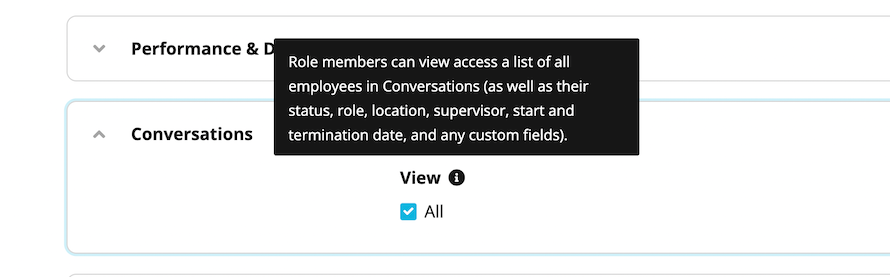
Manage employee attributes visible in the Requester tab
In Conversations, the Requester tab within a request provides the expert with information about the requester. This information is taken from the requester's employee profile in Personio and is based on employee attributes.
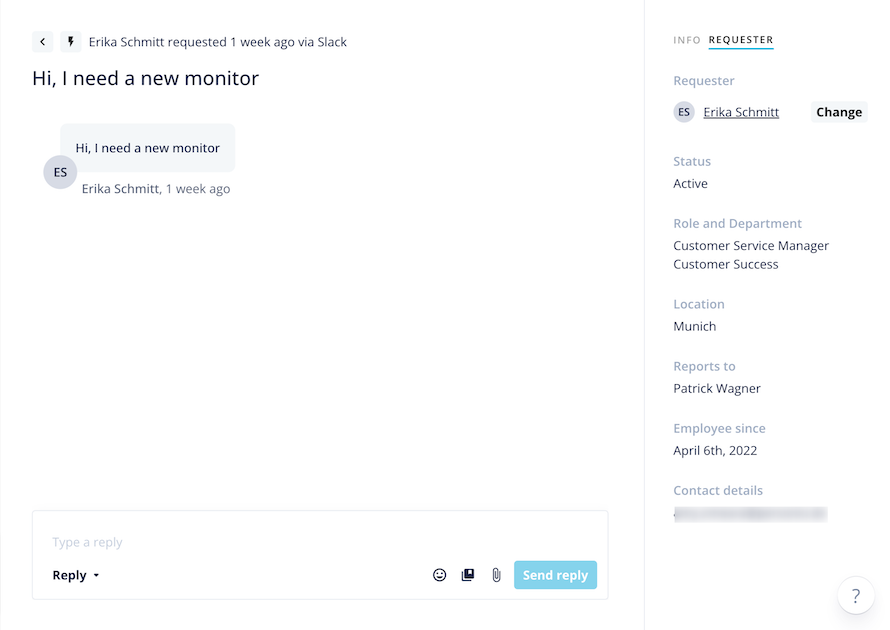
These attributes include preset attributes, including the name of the requester, their status, contact details, and role and department. It is also possible to allowlist other attributes, including custom attributes, via the API credentials in Personio in order to make these attributes visible in the Requester tab.
Note:
Only allowlist the attributes that you want to be visible in the Requester tab. This is to ensure that those with the role of expert cannot see sensitive employee information. Certain attributes, like bank details, cannot be transferred via the API credentials.
To manage which employee attributes are visible in the Requester tab, and to ensure data privacy, follow these steps:
- Go to Settings.
- In the Security & Integrations section, click API credentials.
- Click Conversations.
- Under Readable employee attributes, click the drop-down menu to see the full list of employee attributes.
- Select the attributes that you want to transfer to Conversations. These attributes will appear in the Requester tab.
- Click Save.
Define your language preferences
The language that your Conversations account will appear in depends on your language preferences in Personio (you can define your language preferences in Personio via your Personal Settings). This means that if you have defined your preferred language in Personio as German, then your Conversations account will also appear in German.
The language of the Conversations chatbot in Microsoft Teams and Slack is also based on the personal language preference in Personio. For example, if a requester is using Slack in English but Personio in German, the chatbot will reply in German.
Tip:
When switching between languages in Personio, the change is not always immediate in Conversations or the chatbot. Try refreshing the page or checking back later.
Step 3: Assign roles and set up teams
The first expert should perform the following steps:
- Assign the "Conversations Expert" role to all other experts. Note: Only those with Administrator access can assign roles.
- Create the first teams. Tip: After you have integrated Slack (see the final step below), you can add the associated Slack channels to the relevant teams using the edit teams function.
- Edit teams: add and remove members, edit working hours and assign team categories.
- Create custom request statuses.
- Set up SLAs.
Notes
▶ When setting up Conversations, all your Personio employees will be transferred. This includes inactive employees. However, no email or notification will be sent to them, except if an approval is requested.
Step 4: Integrate Slack or Microsoft Teams
Once you have familiarized yourself with Conversations, you can set up the integration with Slack or Microsoft Teams. (It might be necessary to coordinate with your IT department.) You can now begin to respond to requests that are sent through Slack or Microsoft Teams.
Note:
When you set up Slack or Microsoft Teams, all existing contacts get transferred to Personio Conversations, including contacts outside your organization. However, no email or notification will be sent to them, except if an approval is requested.
Tip:
We recommend integrating Slack or Microsoft Teams, however, this is not a prerequisite to using Conversations, as email is enabled by default.