We're retiring Personio Conversations and transitioning all customers to the Personio Assistant. The Personio Assistant uses the latest AI technology to help employees find answers and reduce HR tickets.
Conversations remains available until 30 June 2026, or your renewal date, whichever comes first. We’ll remove access after that date. The Personio Assistant is included at no additional cost.
In this article, you will learn how to create and send forms in Personio Conversations, and about the benefits of using forms for your internal service teams.
What are forms?
Forms in Conversations allow you to reply to a request with a predefined set of questions. This allows you to collect all of the necessary information in just a couple of clicks.
After a requester has completed a form, you can view the answers from within the request and download them as a CSV file.
The forms functionality is particularly useful for handling requests that require the same initial information every time, for example, requests about hardware upgrades, attending events, and so on.
How to create a form
Tip:
When you create a new form, it is automatically assigned to the team that you are a member of. If you are a member of multiple teams, it is the team that you currently have selected.
You can create a new form in two different ways: from within a request and from the Forms page.
1. Within a request
To create a form within a request, follow these steps:
- Click the Reply button at the left of the message bar and select Form from the drop-down menu.
- In the dialog that opens, select + Create form to create a new form.
- Choose a name for your form, add an introductory message, and add questions. These steps are outlined in further detail in the sections below.
- When you have added your questions, click Done.
2. From Forms page
To create a form from the Forms page, follow these steps:
- Go to Manage > Forms.
- In the dialog that opens, select + Create form to create a new form.
- Choose a name for your form, add an introductory message, and add questions. These steps are outlined in further detail in the sections below.
- When you have added your questions, click Done.
Whether you are creating your form to use right away or preparing it for later, there are three main steps in the process: First you'll have to choose a name, after which you prepare an introductory message, and finally add the questions themselves.
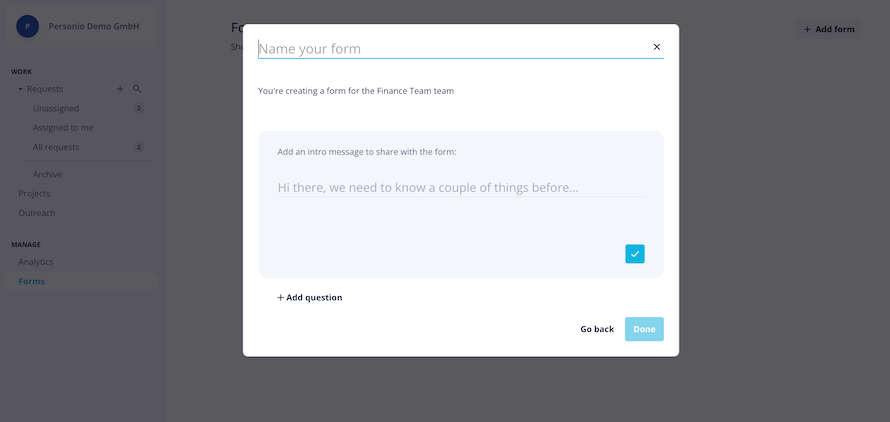
Choosing a name
First you must choose a name for your form. This name will be visible to employees, so choose something that also makes sense for them.
Introductory message
The next part is the introductory message, which serves as a preview for the message that is sent to the requester on email, Slack or Microsoft Teams.
You can use this field to explain what the form is about and to highlight any special information or documents the requester might need to provide.
This text (as well as the titles for questions) is plain text only, however, you can add line breaks by pressing Shift + Enter.
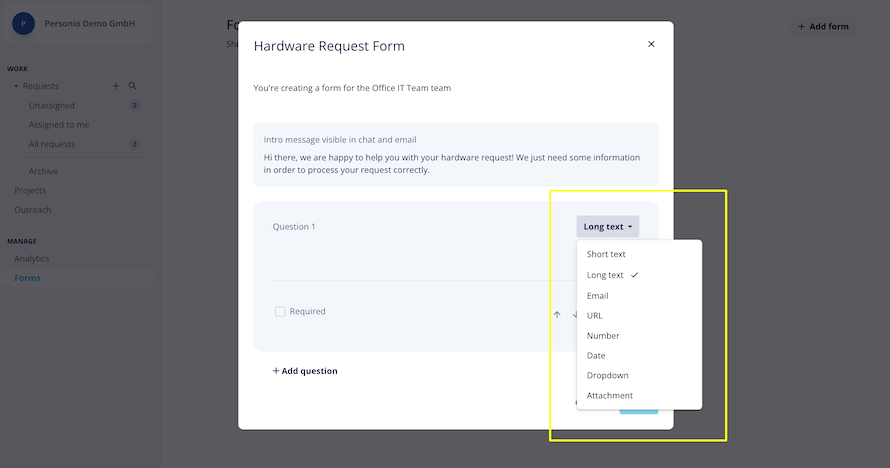
Questions and question types
The final task is to add the questions themselves. You can add as many questions as you want to your form, but we recommend limiting the questions to seven or less. You can specify whether a question is mandatory by selecting the Required checkbox.
There are several question types to choose from, depending on your needs. These are:
- Short text
- Long text
- URL
- Number
- Date
- Dropdown
- Attachment
How to send a form
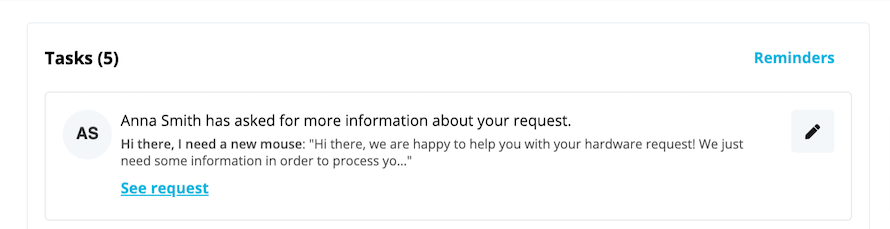
Once you have created a form, you can include it in your replies to requesters. Forms are delivered as regular replies to the requester’s channel of choice (email, Slack or Microsoft Teams). The reply includes the introductory message and a link to an online version of the form.
The requester will also receive a notification about the form in their Personio account. This will appear in their Dashboard (under Tasks) and in their Inbox. This notification will include the name of the expert who is handling the request, the title of the request, a link to the original request, and a link to fill out the form directly.
To send a form, follow the steps below.
- Go to the message bar at the bottom of the request.
- Click on Reply > Form.
- Select the form you want to send.
Tip: You can click on Preview to see what questions are in the form before selecting it. - The message bar will automatically fill with the introductory message, which you can adjust as needed.
- Click Send reply.
Manage form responses
After a requester has submitted their answers, you will receive an automated reply within the request stating that the requester has completed the form. Here you can also preview the answers, and download the answers as a CSV file.
If you have sent a form to multiple employees, you can download the answers in bulk by going to Manage > Forms and selecting Download answers to the right of the relevant form.
Benefits of the forms functionality
- It saves you time by removing the need for back-and-forth conversations.
- It makes it easier for the requester to provide all the right information.
- It allows you to collect and organize information at scale.
More information
You can find more information on Personio Conversations in the following articles.