This article explains how to set up single sign-on (SSO) in Personio with Okta. Follow the steps to complete the setup.
Personio supports the OpenID Connect / OAuth 2.0 protocol. This is an open-source standard for access delegation. When you set up SSO, employees authenticate through an identity provider—in this case, Okta. They don't have to log in using Personio credentials.
We recommend you work with your IT team to set up this type of authentication.
Before you start
- To set up SSO with Okta, you need the following permissions:
- An Administrator role in Personio, or
- An employee role with edit permissions for Account configuration > Authentication.
- Setting up SSO with Okta doesn't automatically sync Personio application users with Okta. To do this, you need to set up the integration with Okta separately. Learn more about our integration with Okta.
- Make sure you’ve already invited your employees to Personio. They each need to activate their account before they can log in.
Create a new application in Okta
To create a new application in Okta, follow these steps:
- Optional: Open Personio and Okta in separate tabs to simplify setup.
- On the Okta administrator dashboard, go to APPLICATIONS > Applications.
- Click Create app integration.
- In the Create a new app integration window, select OIDC - OpenID Connect as the sign-in method. Select Web Application as the application type that integrates with Okta. Click Next.
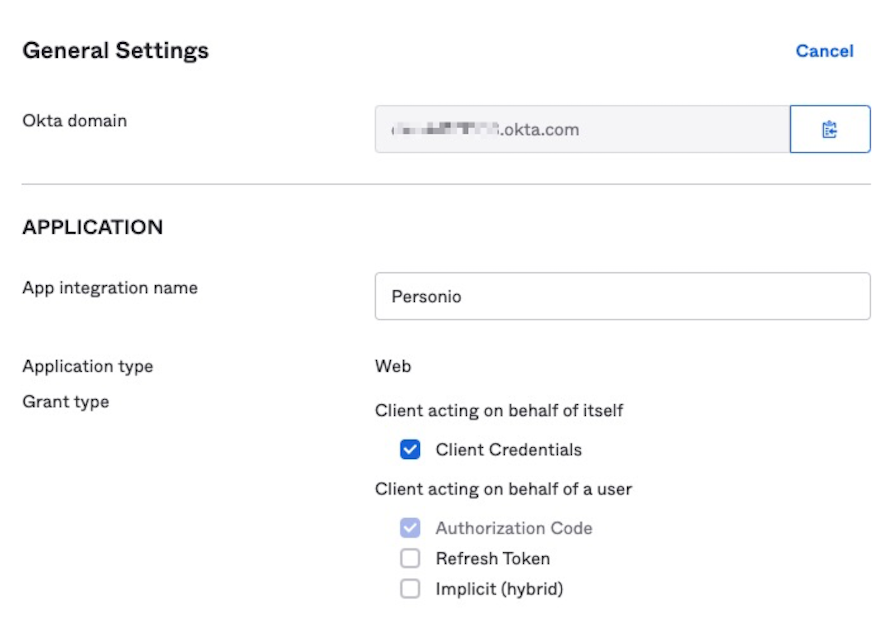
- Under New web integration > General settings, enter the integration name. For example, enter "Personio" into the App integration name field.
-
Optional: Select the Client credentials checkbox.
- In Personio, go to Settings.
- In the Security & integrations section, click Security & authentication.
- From the list of login methods, go to Open ID Connect (OIDC) and click Configure.
- Under Provider settings, copy the URL from the Callback URI field.
- In Okta, go to New web integration > General settings. Paste the URL that you copied earlier into the field under Sign-in redirect URIs. Under Assignments, select the appropriate access level.
- You also need to enter the following address into the field under Sign-in redirect URIs:
- https://login.personio.com/login/callback
- Save your changes.
Build and enter URIs in Personio
To build all the Uniform Resource Identifiers (URIs) to configure OAuth 2.0, follow these steps:
- On the Okta administrator dashboard, go to APPLICATIONS > Applications.
- Go to General Settings. Copy the Okta domain "https://{yourOktaDomain}/oauth2". The Okta domain must always end with "okta.com". You must use the standard domain, for example, "yourcompany.okta.com" to build the URI. Don't use a custom domain if it doesn't include "okta.com".
- In Personio, go to Settings.
- In the Security & integrations section, click Security & authentication.
- From the list of login methods, go to Open ID Connect (OIDC) and click Configure.
- Under Configuration, fill in the fields as described below.
| Field | Details |
| Button display text | Enter the text you want to appear on the login button, for example, “Continue with [your text]”. If you leave it empty, it displays “Continue with SSO” by default. Note that custom text isn't translated. |
| Issuer | Refer to the section below for more information. |
| Authorization URI | Paste the Okta domain that you copied earlier. Use this as a basis to build the URI, for example, "https://{yourOktaDomain}/oauth2/v1/authorize". |
| Token URI | Enter "https://{yourOktaDomain}/oauth2/v1/token". |
| Userinfo URI |
Select GET from the dropdown menu. Paste the Userinfo endpoint "https://{yourOktaDomain}/oauth2/v1/userinfo" into the field. The system selects the Skip reading entities from ID token checkbox by default. Upon login, the system reads user information, including the email address, from the Userinfo URI instead of the Token URI. When setting up OAuth with Okta, you must select this checkbox. |
| JSON Web Key Sets URI | Refer to the section below for more information. |
| Scopes | Enter "openid, email". The "email" field stores the user's email address. |
| Client ID | To find the client ID, go to the Okta administrator dashboard and then to APPLICATIONS > Applications. In General settings, under Client credentials, copy the client ID. Return to Personio and paste the client ID into the relevant field. |
| Client secret | To find the client secret, go to the Okta administrator dashboard and then to APPLICATIONS > Applications. In General settings, under Client credentials, copy the client secret. Return to Personio and paste the client ID into the relevant field. |
| Secret expiry date |
Enter the expiration date of your client secret. Personio sends reminder emails to your Account Owners 30, 14, 7, and 1 day before the date you enter. When you update your secret and expiry date, the reminders stop. We recommend you update this field every time you rotate your secret to keep reminders accurate. If your client secret expires, Personio emails your Account Owner steps to regain access to Personio. |
| Claim field | Select Use default. |
Configure issuer and JWKs URI fields
- The issuer is the issuer identifier of the authorization server in the authorization response. In this field, enter the value of the issuer field from the .well-known/openid-configuration endpoint of your SSO provider.
- The JSON Web Key Sets (JWKs) URI is the discovery URI to a set of public keys. These keys verify any JSON Web Token (JWT) issued by the authorization server. In this field, enter the value of the jwks_uri field from the .well-known/openid-configuration endpoint of your SSO provider.
You can find the issuer and jwks_uri fields in the discovery document endpoint of your SSO provider. You can usually access this through one of these URLs:
- https://example-provider.com/well-known/openid-configuration
- https://example-provider/oauth2/token/.well-known/openid-configuration
- https://example-provider.com/oauth2/authorize/.well-known/openid-configuration
- https://example-provider.com/v2.0/.well-known/openid-configuration
For more information about building URIs, see the Okta reference document OpenID Connect & OAuth 2.0 API.
Review and test
Tip:
If you plan to set Okta as the only enabled login method, perform a configuration test first. This prevents you from locking yourself out if the configuration is incorrect.
- Review the data you've entered in Personio.
- Submit your changes.
- To test the OIDC connection, enable the connection and click the Test button.
- The connection redirects you to sign in to Okta. If there are errors, a message appears to help with troubleshooting.
To use SSO, employees need to have user profiles in both Okta and Personio. The email address entered in Okta under Directory > People > Primary must match the email address used in Personio.
Optional: Enforce SSO with Okta
After you complete the configuration, you can enforce SSO with Okta. To make it mandatory for all employees to log in through Open ID Connect (OIDC), set it as the only enabled login method.