Note:
You can also set up Microsoft Entra ID as your organization's SSO using our native Microsoft connection. This is a different setup from the one described in this article, and it doesn't use OIDC. If this suits your needs, learn how to set up SSO using our native Microsoft connection instead.
This article explains how to set up single sign-on (SSO) in Personio with Microsoft Entra ID using OpenID Connect (OIDC).
SSO connects Personio to an external identity provider such as Microsoft Entra ID. Personio supports the OpenID Connect / OAuth 2.0 protocol. This is an open-source standard for access delegation. When you set up SSO, users authenticate through an identity provider. They don't have to use their Personio credentials.
We recommend you work with your IT team to set up this type of authentication method.
Before you start
- Setting up SSO with Microsoft Entra ID doesn't automatically sync Personio application users with Microsoft Entra ID. To do this, you need to set up the integration with Microsoft Entra ID separately. Learn more about our integration with Microsoft Entra ID.
- Make sure you’ve already invited your employees to Personio. They each need to activate their account before they can log in.
Register and create a new application in Microsoft Entra ID
To register and create a new application in Microsoft Entra ID:
- Optional: Open Personio and Microsoft Entra ID in separate tabs to simplify setup.
- In the Microsoft Entra ID admin center, go to Microsoft Entra ID > App registrations.
-
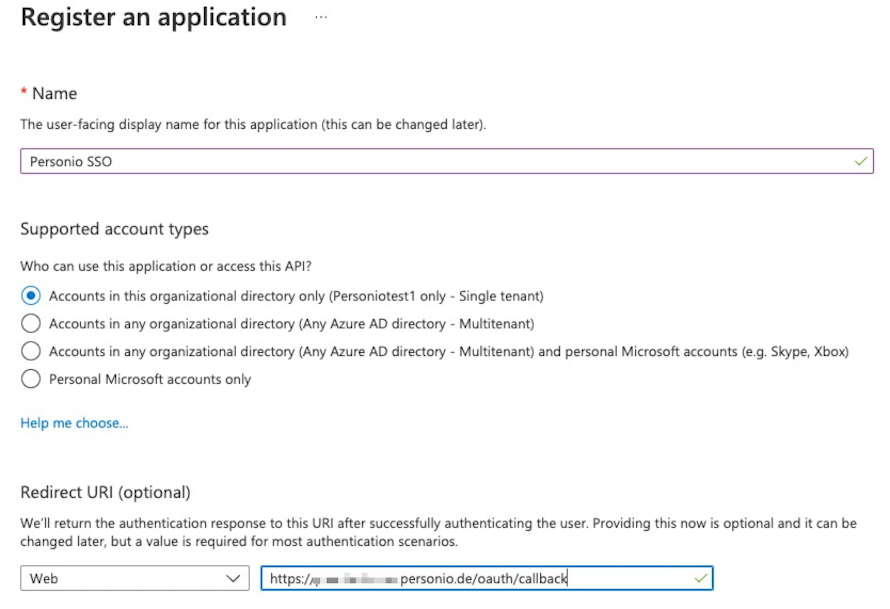
To register a new application such as Personio, click New registration.
- In the Name field, enter a name for the application, for example, "Personio SSO".
- Under Supported account types, select the account type that can use the application or access the API. For security reasons, we recommend selecting Accounts in this organizational directory only (single-tenant). With the other options, it could be possible for users of other tenants to log in to Personio accounts.
- In Personio, go to Settings.
- In the Security & integrations section, click Security & authentication.
- From the list of login methods, go to Open ID Connect (OIDC) and click Configure.
- Under Provider settings, copy the text next to Callback URLs/Redirect UIRs.
- Return to Microsoft Entra ID. Paste the Callback URL that you copied from Personio into the field under Redirect URI.
- You also need to enter the following address into the field under Redirect URI:
- https://login.personio.com/login/callback
- Ensure you select Web from the drop-down menu as the redirect type.
- Register the application.
A confirmation message appears, and the system redirects you to the new application.
Copy URIs to Personio
After creating the Personio application, you need to copy the Authorisation URI and the Token URI from Microsoft Entra ID to Personio. You also need to add the Userinfo URI to Personio.
Note:
Microsoft sets the Userinfo URI: https://graph.microsoft.com/oidc/userinfo. It's not specific to your Microsoft Entra ID domain. https://graph.microsoft.com is not sufficient.
To copy URIs to Personio:
-
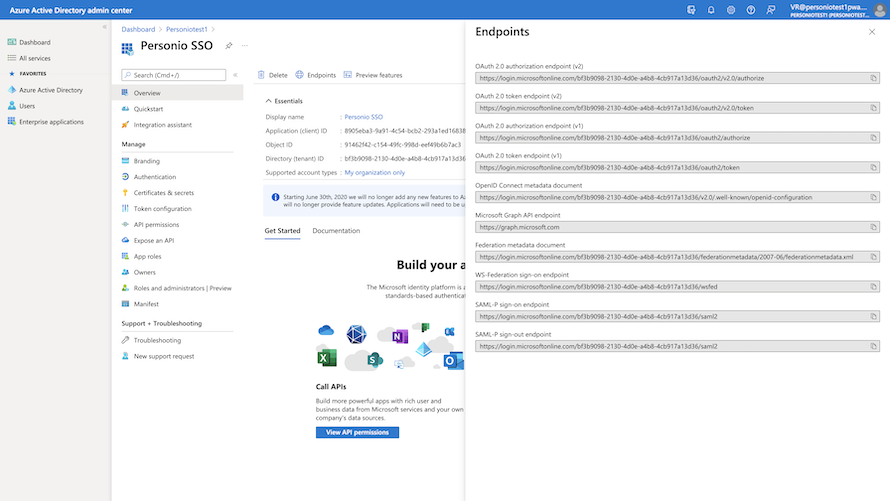
In the new application you have created in Microsoft Entra ID, go to Overview > Endpoints and click Endpoints.
- Copy the value in the OAuth 2.0 authorization endpoint (v2) field.
- In Personio, go to Settings.
- In the Security & integrations section, click Security & authentication.
-
From the list of login methods, go to Open ID Connect (OIDC) and click Configure.
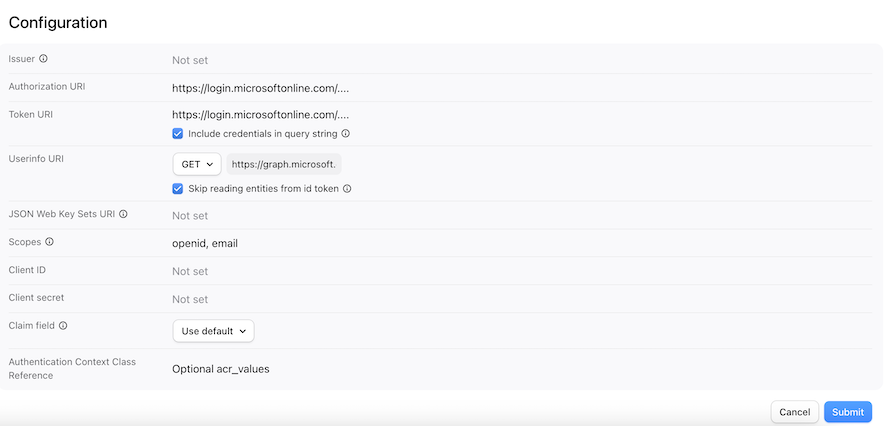
- In the Button Display Text field, enter the text you want to appear on the login button (for example, “Continue with [your text]”). If you leave it empty, it displays “Continue with SSO” by default. If you choose to add custom text, it will not be translated.
- Paste the value that you copied earlier from the OAuth 2.0 authorization endpoint (v2) field into the Authorization URI field.
- Return to Overview > Endpoints in Microsoft Entra ID. Copy the value in the OAuth 2.0 token endpoint (v2) field.
- Return to Personio. Paste the value into the Token URI field.
- Under Userinfo URI, select GET from the drop-down menu. Paste the Userinfo endpoint "https://graph.microsoft.com/oidc/userinfo" into the field. The system selects the Skip reading entities from ID token checkbox by default. This means that, upon login, the system reads user information, including the email address, from the Userinfo URI at login, not the Token URI. Clear the checkbox if you want to read user information from the Token URI at login instead of the Userinfo URI. This makes it possible to use OAuth with Active Directory Federation Services (ADFS).
- Under Scopes, enter "openid, email".
Configure issuer and JWKs URI fields
- The issuer is the issuer identifier of the authorization server in the authorization response. In this field, enter the value of the issuer field from the .well-known/openid-configuration endpoint of your SSO provider.
- The JSON Web Key Sets (JWKs) URI is the discovery URI to a set of public keys. These keys verify any JSON Web Token (JWT) issued by the authorization server. In this field, enter the value of the jwks_uri field from the .well-known/openid-configuration endpoint of your SSO provider.
You find the issuer and jwks_uri fields in the discovery document endpoint (the well-known configuration page) of your SSO provider, mainly through your "Directory (tenant) ID".
You need the following information from your SSO provider’s setup:
- The correct Security Token Services (STS) endpoints for Azure Active Directory (Azure AD) that your tenant uses. This is either sts.windows.net or login.microsoftonline.com.
- The correct "Directory (tenant) ID".
Use this information to find the correct well-known configuration endpoint depending on your tenant setup. For example:
- https://sts.windows.net/{insert_your_tenant_id_here}/.well-known/openid-configuration
- https://login.microsoftonline.com/{insert_your_tenant_id_here}/v2.0/.well-known/openid-configuration
Other variations might include:
- https://…/.well-known/openid-configuration
- https://…/oauth2/token/.well-known/openid-configuration
- https://…//oauth2/authorize/.well-known/openid-configuration
- https://…//v2.0/.well-known/openid-configuration
For Microsoft Entra ID using v2, this value ends in /v2.0.
On the well-known configuration page, you find the main fields you need to add in the Authentication settings page in Personio:
- Issuer
- Authorization URI
- Token URI
- Userinfo URI
- JSON Web Key Sets URI
If your Entra ID application uses custom signing keys:
- You also need to extend your JSON Web Key Sets URI with a query parameter called “appid’.
- Instead of https://login.microsoftonline.com/{insert_your_tenant_id_here}/discovery/keys, your JSON Web Key Sets URI should be https://login.microsoftonline.com/{insert_your_tenant_id_here}/discovery/keys?appid={insert_your_client_id_here}.
You need to add this parameter if you see an error during test login, such as “no valid key found in issuer’s jwks_uri for key parameters”.
Register a new client secret
To register a new client secret:
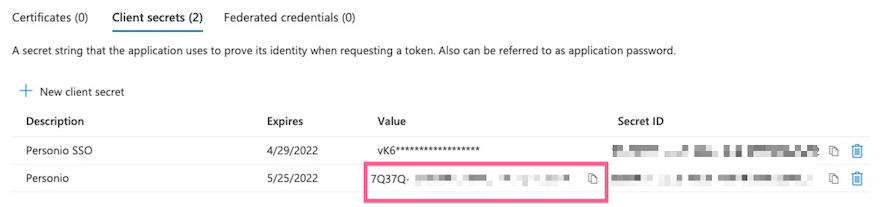
- In the application you have created in Microsoft Entra ID, go to Manage > Certificates & secrets.
- Select Client secrets.
- The Add a client secret drawer appears.
- In the Description field, enter a name for the client secret. Then, choose the relevant expiry date from the Expires drop-down menu.
- Click Add.
-
A page shows an overview of the application credentials. Copy the value listed under the Value column.
- In Personio, go to Settings.
- In the Security & integrations section, click Security & authentication.
- From the list of login methods, go to Open ID Connect (OIDC) and click Configure.
- Paste the value that you copied earlier into the Client secret field.
- In the Secret expiry field, enter the expiration date of your client secret. Personio sends reminder emails to your Account Owners 30, 14, 7, and 1 day before the date you enter. When you update your secret and expiry date, the reminders stop. We recommend you update this field every time you rotate your secret to keep reminders accurate. If your client secret expires, Personio emails your Account Owner steps to regain access to Personio.
- Return to Microsoft Entra ID > Overview. Copy the Application (client) ID value.
- Return to Personio. Paste the value into the Client ID field.
Select the claim
Under Claim field, select the field in Microsoft Entra ID with the email addresses of your employees. To validate that an employee exists in Personio, we check if the value in this field corresponds to the email address used in Personio. Depending on your setup in Microsoft Entra ID, you can choose between "email", "unique_name", "sub", and "upn".
Tip:
If you select Use default, we check the fields "email", "unique_name", and "sub" in sequential order until we find one that contains a value. If the email addresses of your employees are in the User Principal Name (UPN) field in Microsoft Entra ID, select "upn" here.
Review and test
Tip:
If you plan to set Microsoft Entra ID as the only enabled login method, perform a configuration test first. This prevents you from locking yourself out if the configuration is incorrect.
To review and test:
- Review the data you've entered in Personio.
- Submit your changes.
- To test the OIDC connection, enable the connection and click the Test button.
- The connection redirects you to sign in to your identity provider. If there are errors, a message appears to help with troubleshooting.
To use SSO, employees need to have user profiles in both Microsoft Entra ID and Personio. The email address entered in Microsoft Entra ID in the field you have selected under Claim field must match the email address used in Personio.
Error: AADSTS50146
If you see the error: "AADSTS50146: This application is required to be configured with an application ID URI":
- Open the "Manifest" section of the affected app registration in Microsoft Entra ID.
- Update the setting "acceptMappedClaims" to "True".
Enforce SSO with Microsoft Entra ID
After you set up SSO with Microsoft Entra ID, login through OAuth is optional. Your employees can choose to log in to Personio using their Personio credentials or through OAuth. To make it mandatory for all employees to log in through OAuth, click Enforce OAuth.