We're retiring Personio Conversations and transitioning all customers to the Personio Assistant. The Personio Assistant uses the latest AI technology to help employees find answers and reduce HR tickets.
Conversations remains available until 30 June 2026, or your renewal date, whichever comes first. We’ll remove access after that date. The Personio Assistant is included at no additional cost.
This article explains how to respond to an employee request using Personio Conversations. You will also learn about the different communication features that you can use within a request.
How can employees submit requests?
Employees can send requests through Slack or Microsoft Teams (these communication channels can be integrated when you are implementing Conversations). Email is enabled by default whereby requests to specific addresses are automatically routed to Conversations. Once a request is sent, it is visible in Conversations and can be actioned by an expert.
Learn more about how employees in your company can submit a request using Conversations.
Respond to a new request
After an employee submits a request, it will appear in your Team dashboard as Unassigned. This means that it has yet to be assigned to anyone. The request will have the tag New Request.
Tip:
If an expert opens a request, the request will still have the tag New Request for the rest of the experts until they open it.
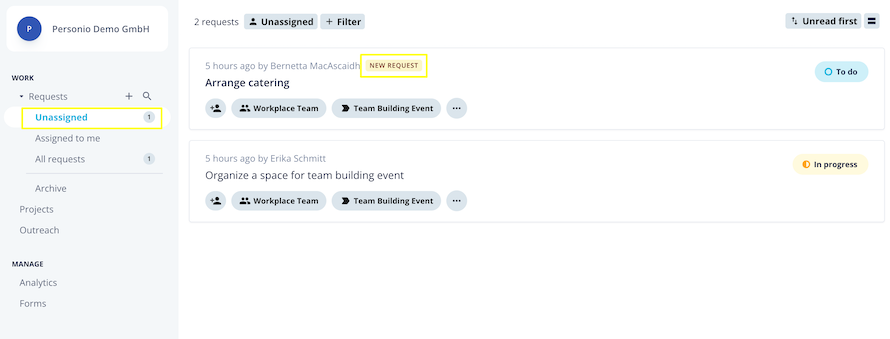
You can either assign the request to yourself or another member of the team may assign it to you.
To respond to a request, follow these steps:
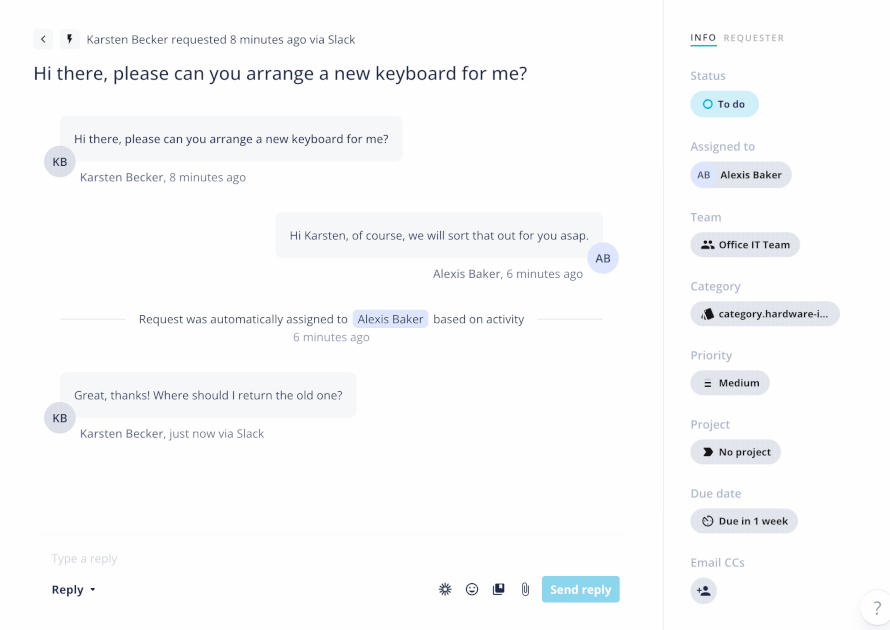
- Go to Conversations > Requests > Assigned to me.
- Open the request that you want to work on.
- Under the Info tab on the right sidebar, select any fields that are relevant to the request, such as the status, priority, and due date. The Requester tab contains relevant information about the requester.
- Type your reply in the message bar at the bottom of the request and click Send reply.
- Return to the Info tab in the right sidebar and adjust the status of the request.
The requester will be able to see your reply based on the communication channel that they used to send the original request.
The Requester tab
You can view information about the requester under the Requester tab in the right sidebar within the request. This information is taken from the requester's Personio employee profile and includes the following:
- Name
Tips
▶︎ Click on the link in the employee's name to easily navigate to their employee profile in Personio.
▶︎ You can change the requester in the Requester tab using the Change button to the right of the name. - Role and department
- Location
- Supervisor
- Employee start date
- Termination date (if applicable)
- Email address
- Additional employee attributes
Notes
▶︎ The Requester tab also includes employee attributes from Personio that you can allowlist via the API credentials. To manage which employee attributes are visible in the Requester tab, and to ensure data privacy, refer to our article on how to implement Conversations.
▶︎ Custom attributes that have been added to the employee profile after the initial setup need to be manually added within the API credentials again.
Communication features
There is a range of communication features that you can use within requests. These features enable you to process requests quickly and efficiently, as well as collaborate more effectively.
The table below shows the communication features that you can use within requests.
| Feature | Use |
| Attach an answer | If your organization is using the AI-Powered Answers feature, then you can choose an existing article from your internal knowledge base to attach to your answer. |
| Attachments | Send and receive file attachments. |
| Internal Notes | Create internal notes visible only to you and others with access to the request. |
| Forms |
Attach customized forms based on predefined questions and download answers to a CSV. Learn more in the article Using forms to handle requests. |
| Approvals |
Send an approval request to anyone within or outside your organization. Note: |
| Saved replies | Save commonly used replies as templates that can be used when responding to employee requests. |
| External communication |
Include users outside your organization in replies and notes as a one-off message. Type "+" in the text box to add one or more e-mail addresses. The next message will be sent out to the address(es) tagged. |
| Rich text formatting |
Use the formatting toolbar in the message bar of a request to adapt the message to your needs. Set text to bold or italic, add inline links and emojis, and use numbered or bulleted lists. |
More information
Manage employee requests in Personio Conversations