This article explains how to set up the Personio MCP connector. With the MCP connector, you can connect AI tools, such as Claude, directly to your Personio account. Depending on your setup, this enables your connected AI tools to:
- Connect directly to your Personio data, and
- Complete a small set of actions on your behalf
The Personio MCP server is currently in beta and isn’t available for everyone yet. You can test it and share feedback before the wider release. Go to Personal settings > Personio MCP in your Personio account and select Give feedback.
Main features
The Personio MCP server currently supports the following capabilities:
- Read access for connected AI tools to retrieve data such as employee profiles, time off, compensation, and performance information.
- Limited write operations that initiate Personio-controlled workflows, for example, requesting time off. Write access is off by default.
- Tool-level controls that let you turn individual capabilities, such as reading compensation or listing time off periods, on or off for every connected AI tool.
- Person attribute-level controls that let you hide specific employee fields, such as address or IBAN, from connected AI tools.
Before you start
Permissions
- To enable the MCP server, you need an Administrator role in Personio.
- You also need an account on a supported AI tool and the necessary permissions within that tool to set up custom connectors.
- The Personio MCP server respects your individual permissions configured in Personio. For example, to view compensation data for the Marketing department through the MCP server, you need View permissions for Salary information for that department. The MCP server never grants more access to data than you already have.
Available AI tools
The following AI tools are available:
- Anthropic Claude (web, desktop, Cowork, IDE/CLI)
- Google Antigravity
- Visual Studio Code (GitHub Copilot)
To set up Claude, you need admin permissions in your organization's Claude account.
Configure your Personio MCP connector
Follow the steps below to connect the Personio MCP server to your AI tool.
Step 1: Enable Personio MCP server access
Note:
Make sure you select the level of access that best suits your organization’s security requirements. By connecting your AI tool to the MCP, you may be allowing your AI tool to access and store sensitive HR data outside Personio. Learn more about data privacy and controls.
Follow these steps in Personio:
- Go to Settings.
- In the Account & support section, click AI features.
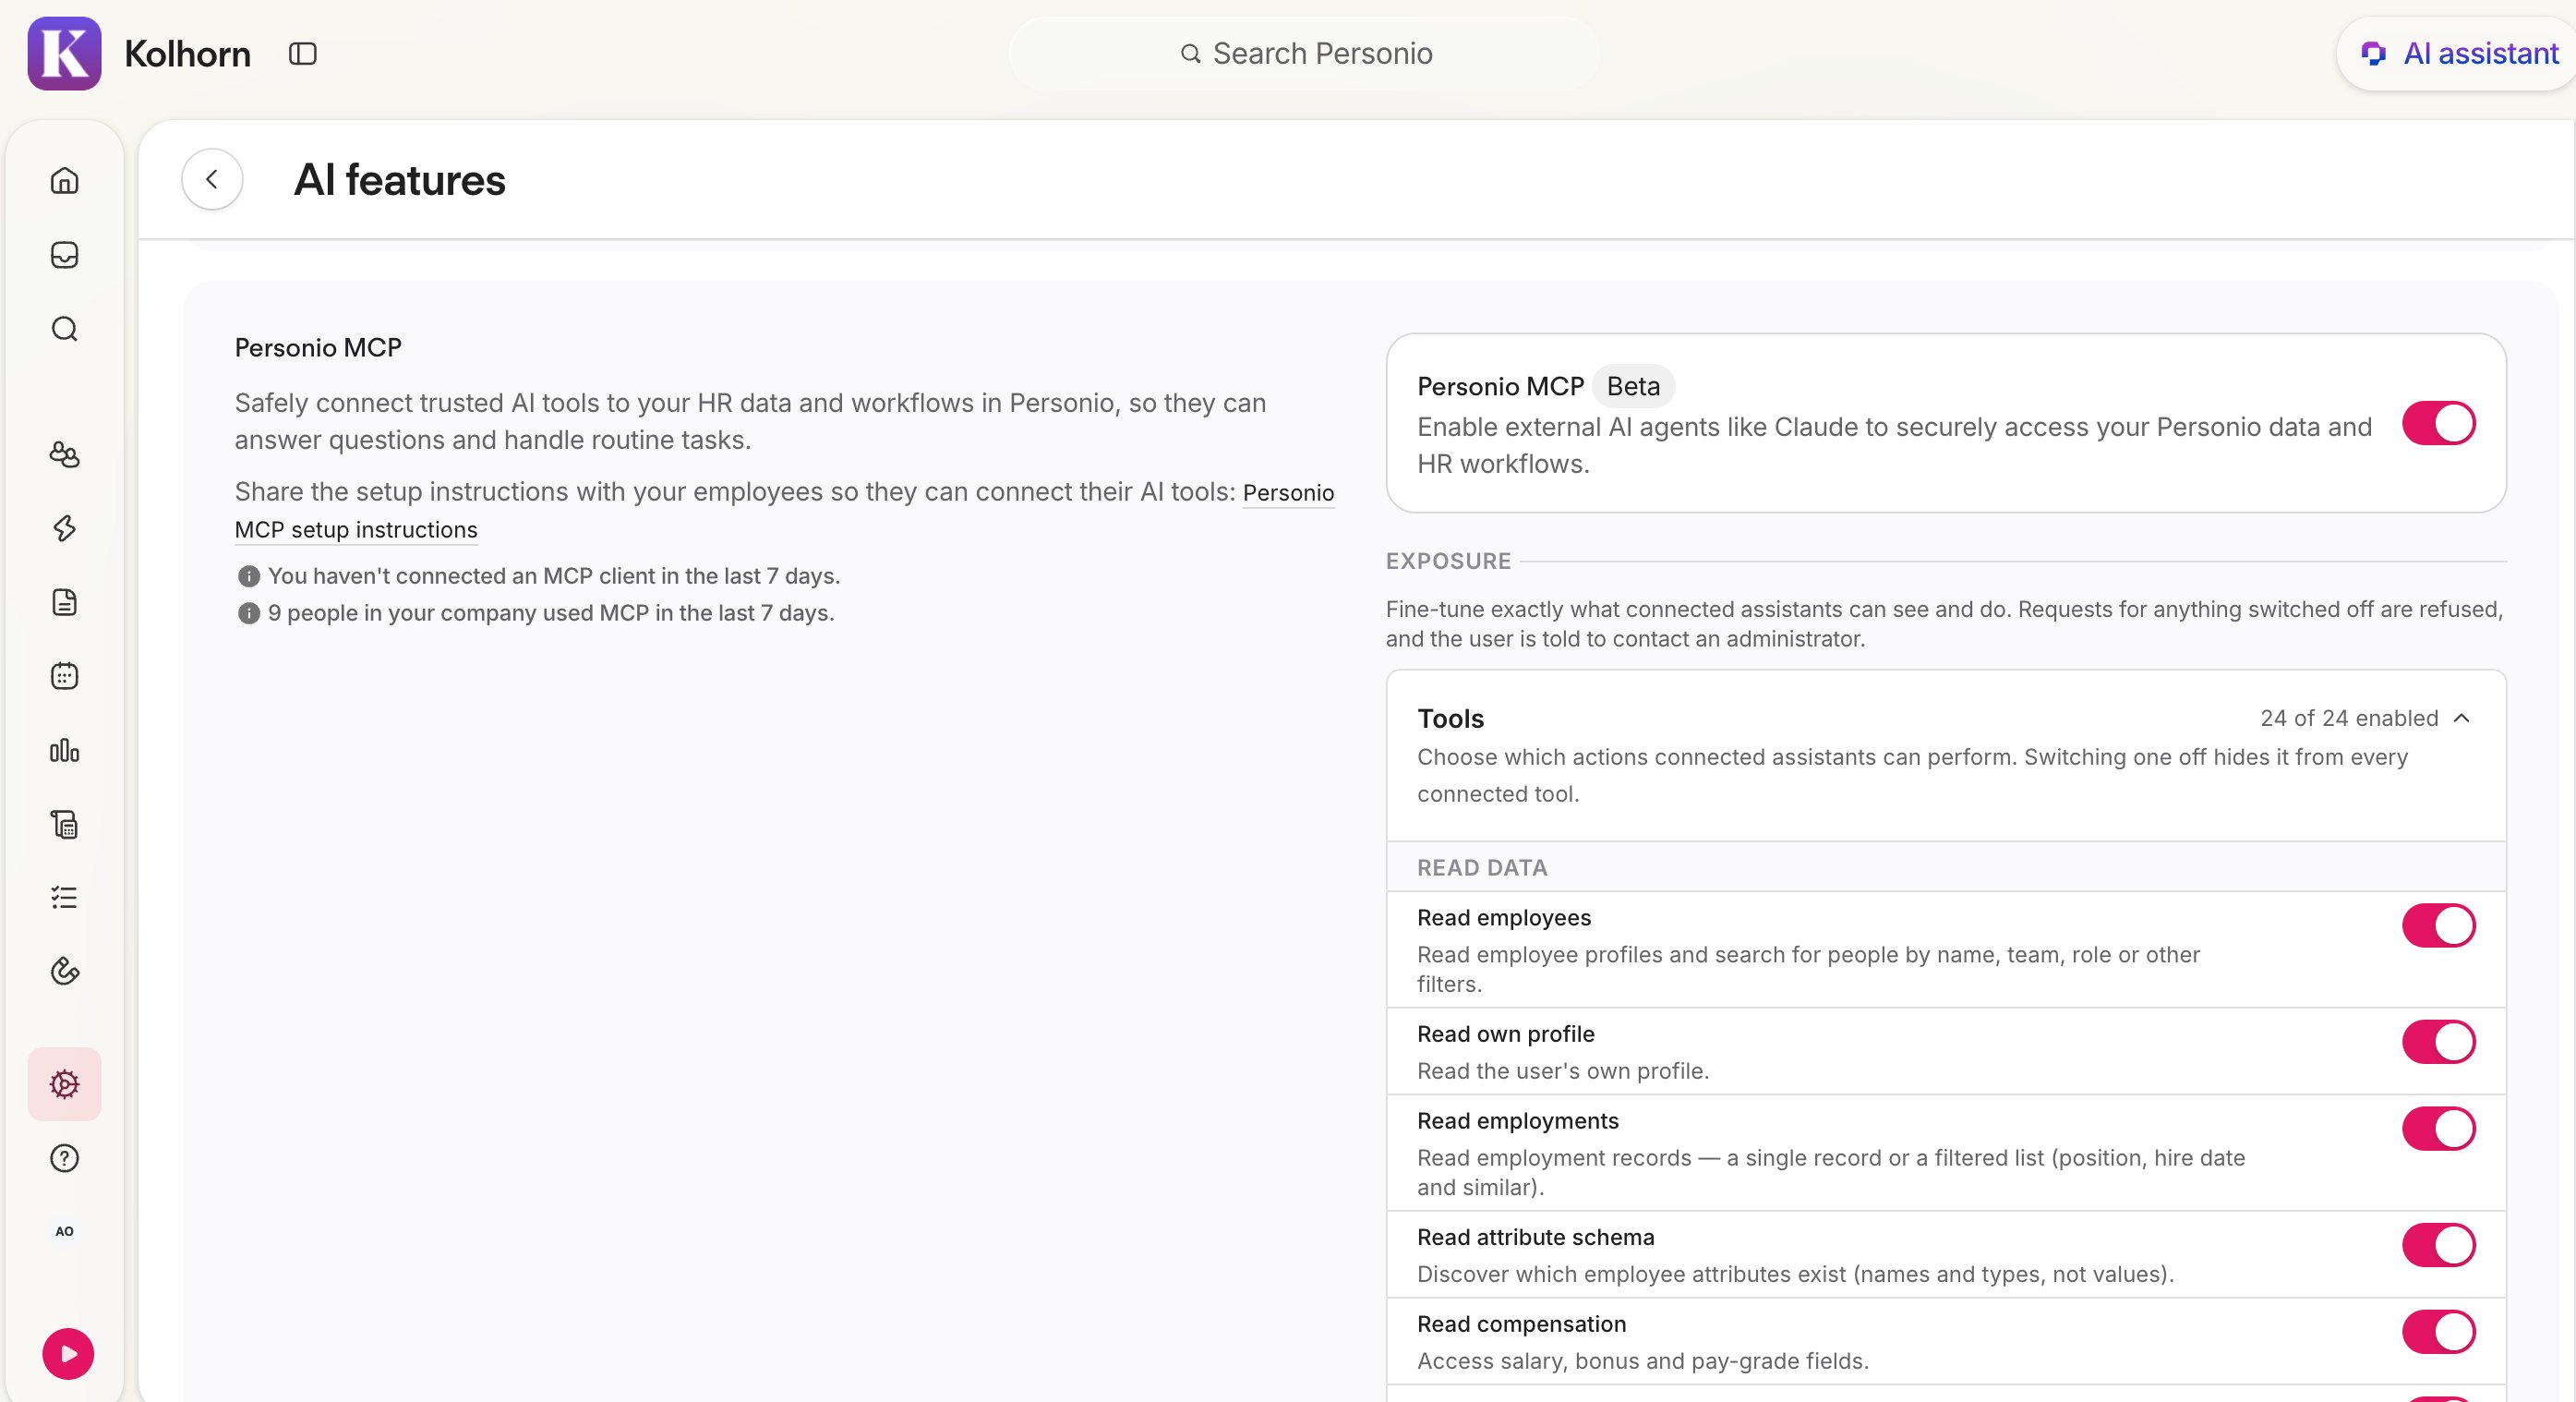
- Go to the AI features section and enable General access using the toggle.
- Go to the Personio MCP section and enable Personio MCP using the toggle.
- Review the Tools list and disable any individual tool (for example, reading compensation data) that you don't want connected AI tools to use. When you disable a tool, it’s hidden from every connected AI tool.
- Review the Person attributes list and disable any attribute (for example, address or IBAN) that you don't want connected AI tools to read. To update several attributes at once, you can click Allow none or Allow all shown.
- Tip: The Tools and Person attribute controls sit alongside the per-tool approval settings in your AI tool (step 4). The Personio toggles set the hard boundary, and the AI tool settings narrow it further per user.
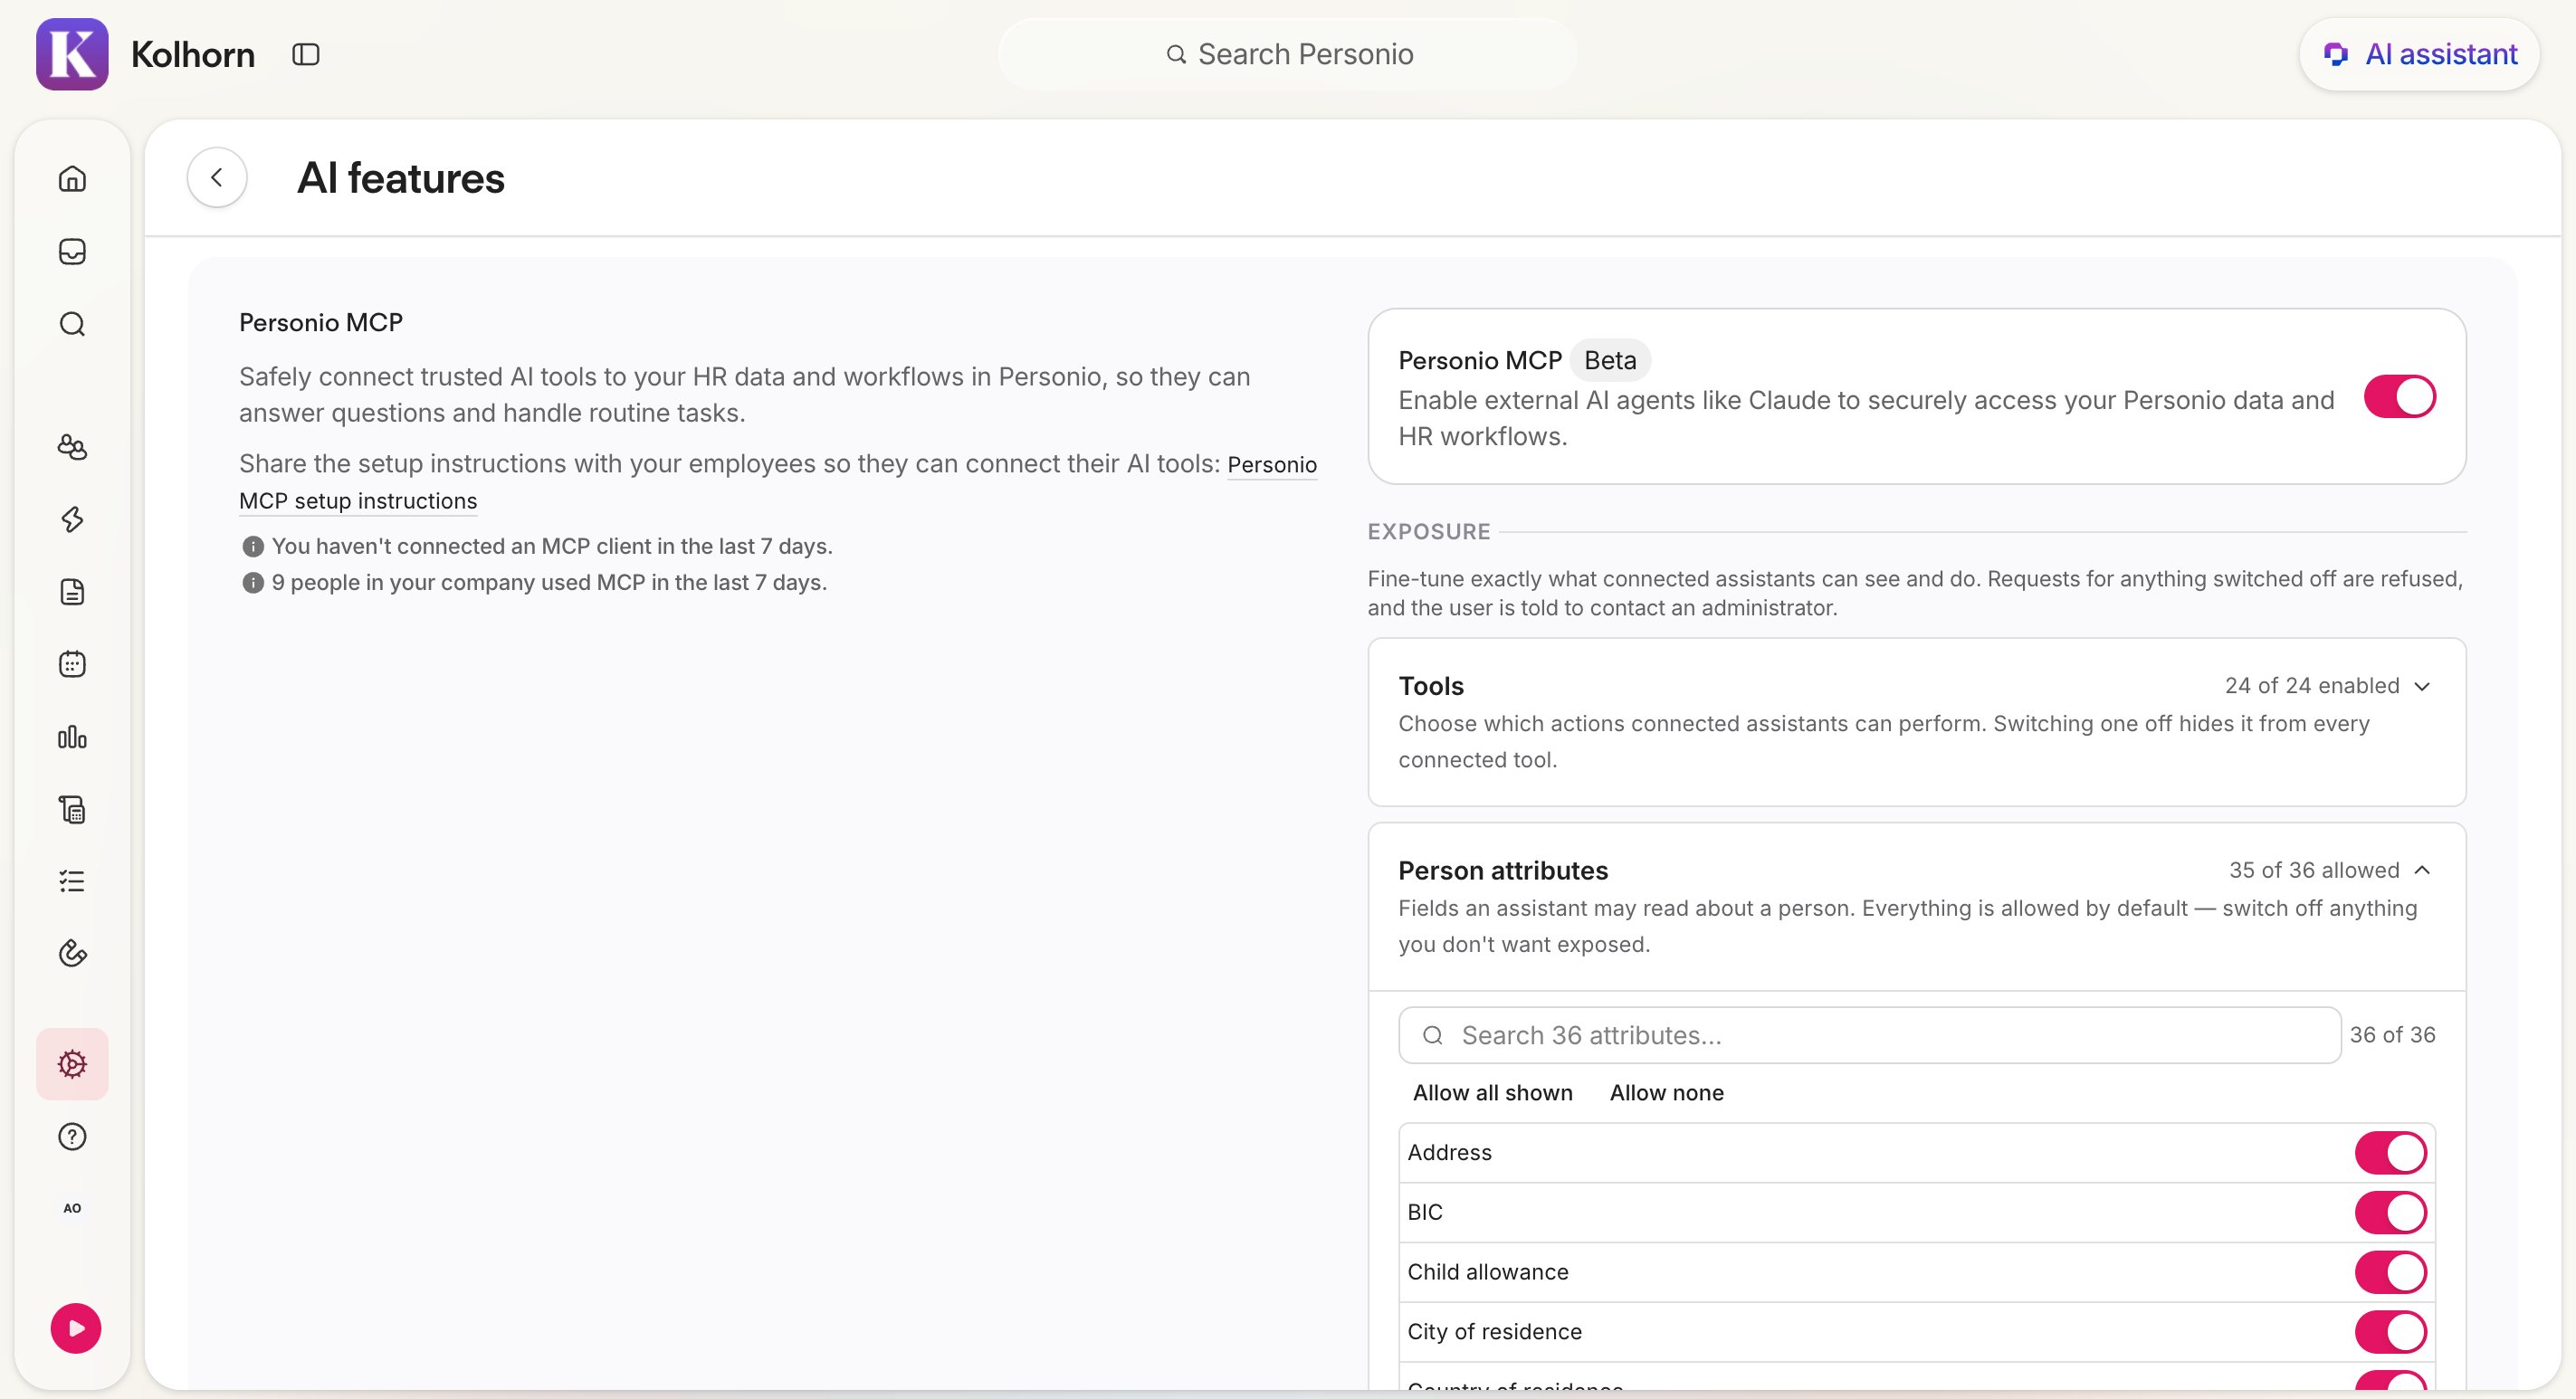
Once you've configured the settings above, continue as follows:
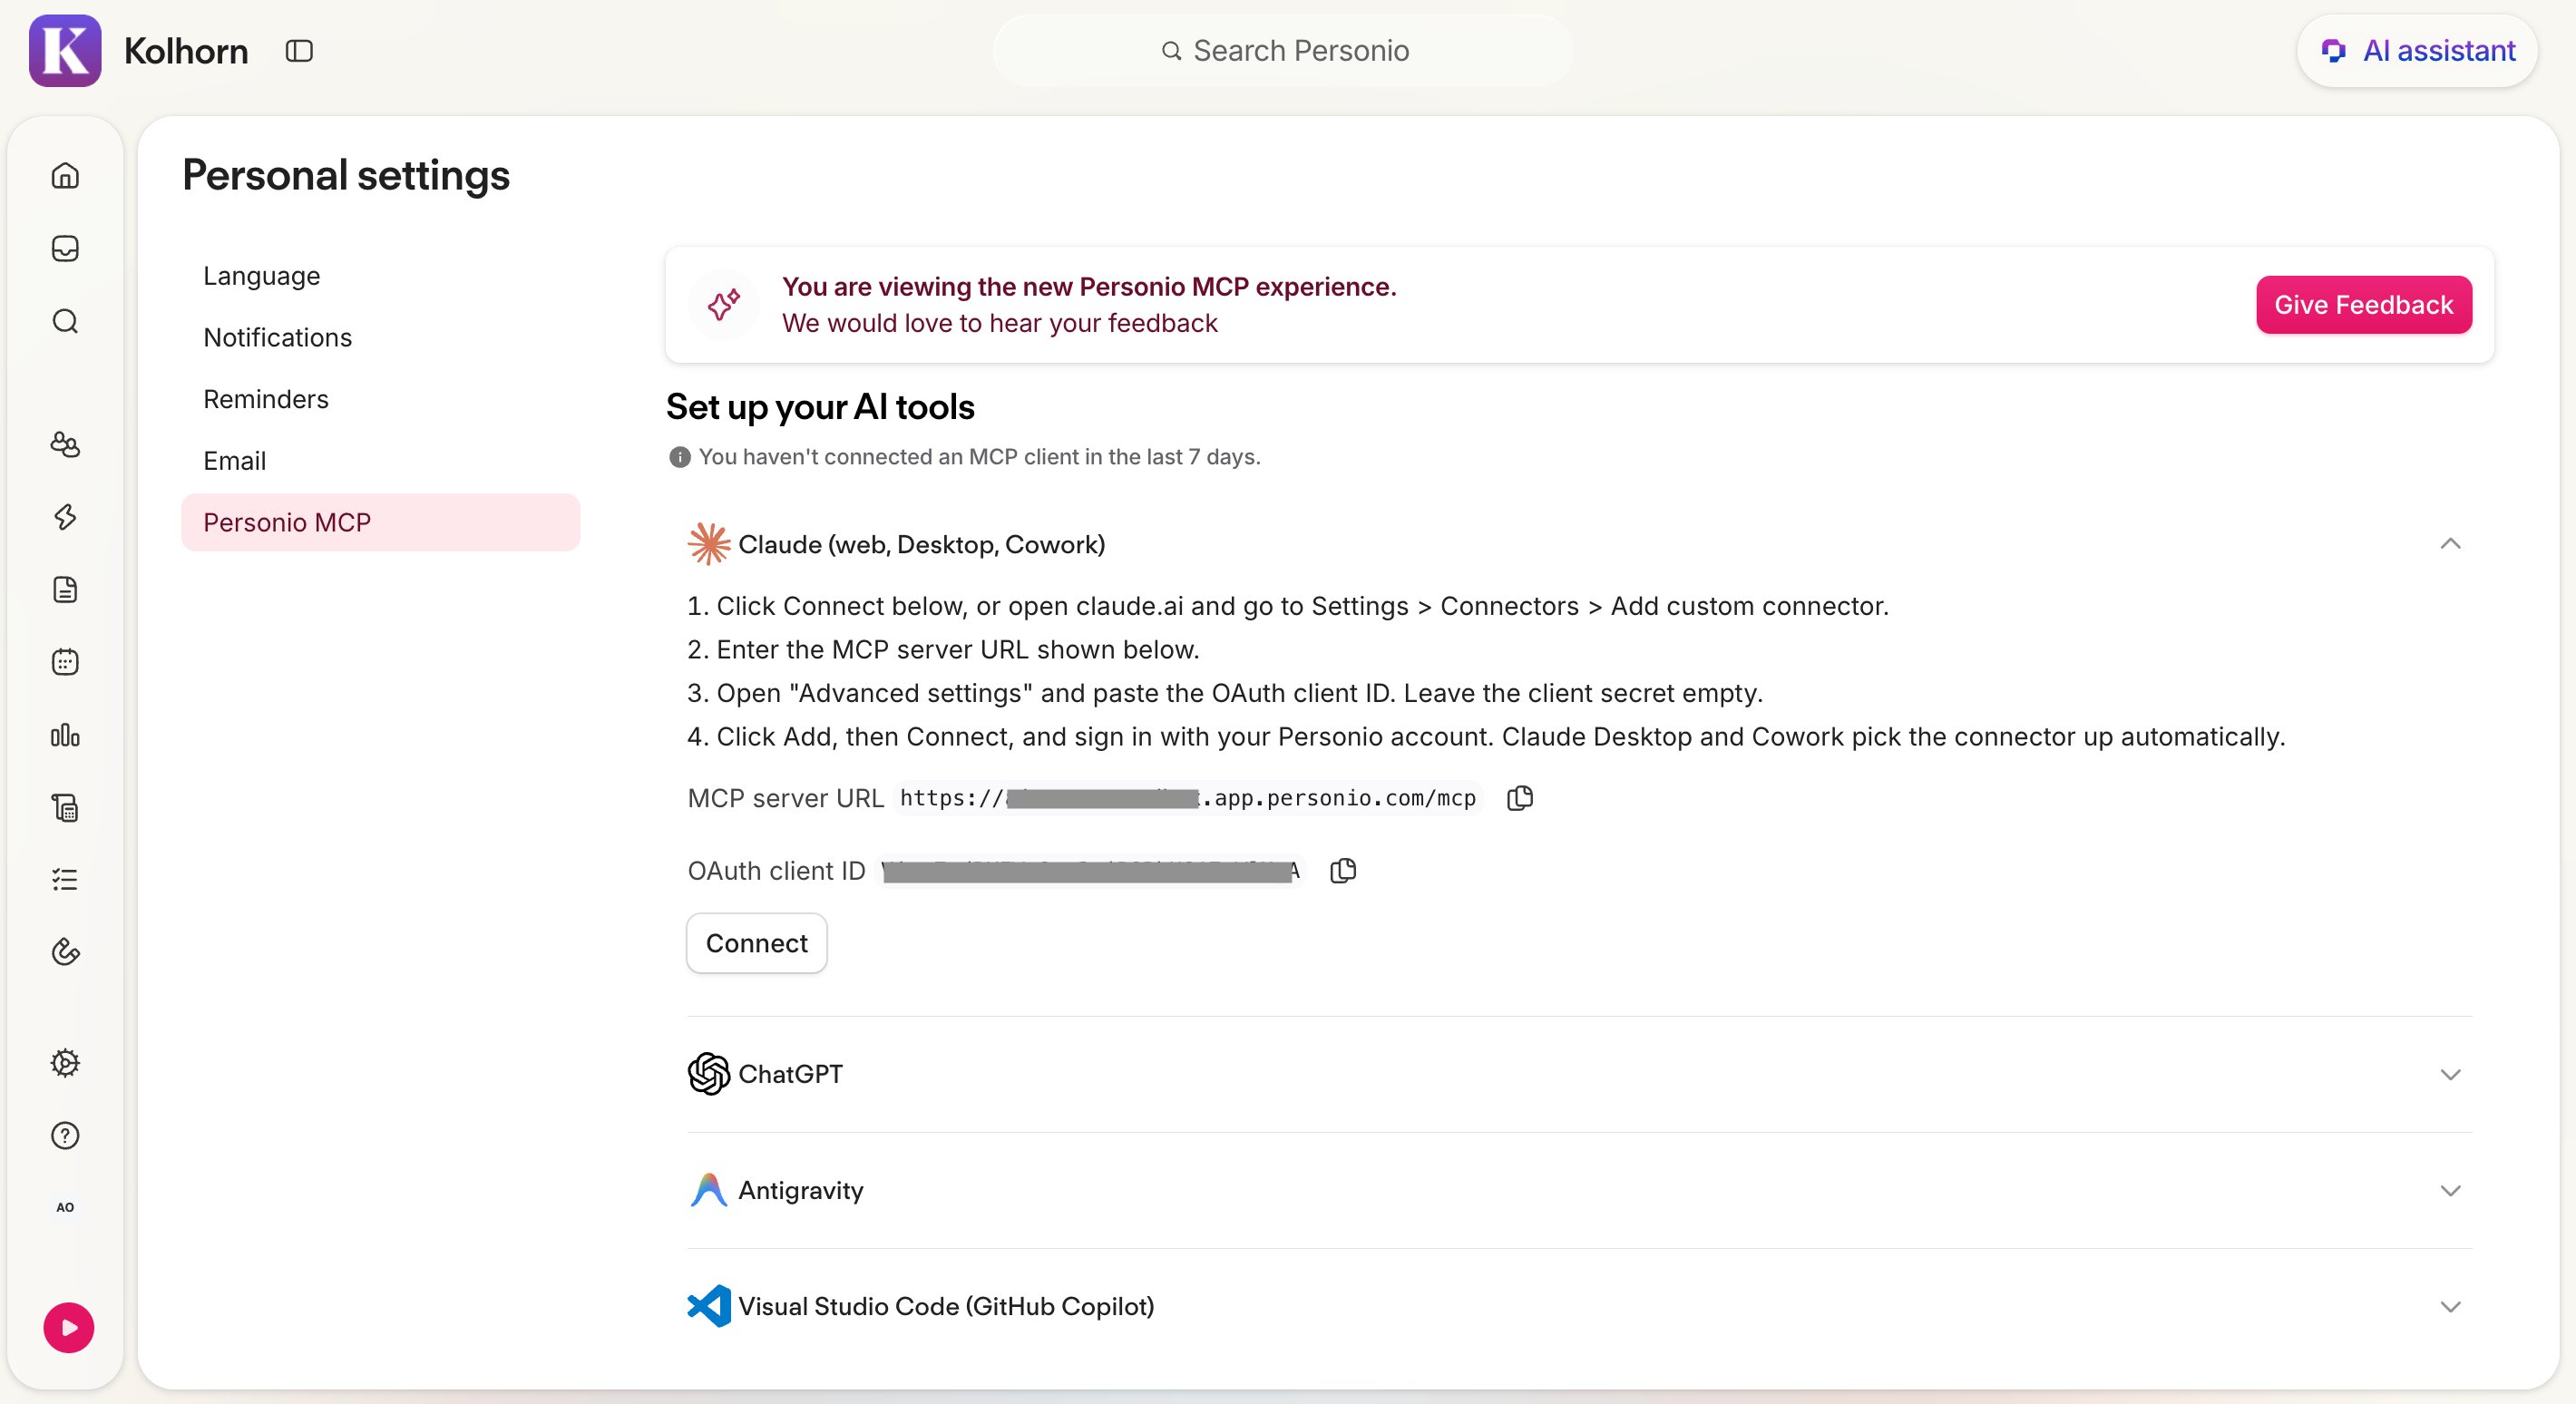
- Go to your Personal settings.
- In the Personio MCP tab, click the relevant AI tool to expand it.
- From the expanded section, copy your MCP server URL and OAuth Client ID. You’ll need these values in the next step.
- Tip: Your MCP server URL follows this pattern: https://yourcompany.app.personio.com/mcp
Step 2: Connect your AI tool
Connect the MCP server to your AI tool.
Anthropic Claude
You can configure the Personio MCP connector in Anthropic Claude either through the Claude desktop app or via the CLI. See Claude's custom connector documentation for more information.
To connect using the Claude Desktop app:
- Open claude.ai and go to Settings > Connectors > Add custom connector. You can also click Connect if you're following a link from Personio.
- Enter the MCP server URL that you previously copied from your Personal settings in Personio (see step 1).
- Open Advanced settings and paste the OAuth Client ID that you previously copied from your Personal settings in Personio (see step 1). Leave the client secret field empty.
- Click Add, then Connect, and sign in with your Personio account.
Claude Desktop and Cowork pick the connector up automatically.
To connect using the CLI:
Run the following in the Terminal app. Replace the connector name, MCP server URL, and OAuth Client ID with your values from step 1:
claude mcp add [custom-connector-name] --transport http [mcp-server-url] --client-id [client-id] --callback-port 5000Then open Claude Code and run /mcp. Choose the connector name you just added and authenticate.
If the connector doesn't appear after you add it, run /login in Claude and log in again. Whenever you change the MCP setup, you need to log in again in Claude itself (not the MCP).
Google Antigravity
- Merge the snippet below into the mcpServers section of ~/.gemini/config/mcp_config.json. See the Antigravity MCP docs.
- Restart Antigravity, open Settings > Customizations > Installed MCP Servers, and click Authenticate next to Personio.
- Sign in with your Personio account in the browser window that opens.
{
 "mcpServers": {
   "personio": {
     "type": "http",
     "url": "https://$HOSTNAME.app.personio.com/mcp",
     "oauth": {
       "enabled": true,
       "clientId": "<your-oauth-client-id>",
       "redirectUri": "http://localhost:5000/oauth/callback",
       "scopes": ["mcp:access"]
     }
   }
 }
}
Visual Studio Code (GitHub Copilot)
- In Visual Studio Code 1.101 or later, run MCP: Add Server… from the command palette and enter your MCP server URL.
- When Visual Studio Code asks for authentication, choose to provide client credentials manually and paste the OAuth Client ID. Leave the client secret empty.
- Sign in with your Personio account. The Personio tools appear in Copilot Chat (agent mode).
Step 3: Find the Personio MCP connector in your AI tool
Find the Personio MCP connector in your AI tool.
- In Claude Desktop, go to Customize > Connectors, then search for "Personio."
- In Antigravity, you can find it on the settings page.
- In Visual Studio Code, the Personio tools appear in Copilot Chat (agent mode).
This step needs to be performed at a user level. That is, each user needs to find and add the connector on their desktop app.
Step 4: Customize access restrictions within your AI tool
After you connect the MCP server, you need to customize access restrictions. This lets you control which Personio capabilities your AI tool can use freely, which require approval before running, and which are switched off entirely. In Claude, you manage these restrictions from the connector's settings page.
For each AI tool you connect, for example, Claude, customize your access restrictions as follows:
- Review the available tools. Each tool maps to a capability in the table below.
- Set a permission for each tool. Allow it automatically or require user approval each time it runs. We recommend requiring approval for any Write action, such as requesting time off, and for tools that read sensitive data, such as compensation.
- Disable any tool you don't need. Turning off a tool in the connector prevents the AI tool from calling it, regardless of the read or write settings in Personio.
Keep in mind: The Tools and Person attributes toggles in Personio set the general boundary of what's possible. You can narrow that boundary further with the settings in your AI tool, per tool and per user.
Capabilities and data available via the Personio MCP
The following table lists the current capabilities available through the Personio MCP server. The capability to approve time off is coming soon.
| Use case | Useful for | Operation | Sample prompts |
|
Extract employee data Pull employee data via AI tool to extract employee profile data to perform ad hoc analysis. |
Administrators, HR Business Partners, HR Operations | Read | "Create a spreadsheet of employees in the London office, along with their T-shirt size." |
|
Employee data quality check Flag profiles with missing/invalid fields (job names, occupation keys, required payroll attributes). |
Administrators | Read | "Prepare a list of London-based employees who don’t yet have a phone number listed, and add an event on their calendar on Friday morning at 08:00 to remind them to update their profile by the end of the day." |
|
Request time off Employees trigger time off requests via AI tool. An approval request is triggered for the specific time off request. |
Employees | Write | "I’d like to take the last Friday and the following Monday of this month off. Can you request paid vacation for me?" |
|
Time off balance and history lookup Admins, supervisors, and HR Business Partners can view and analyze time off history details of employees. Typically done before time off reviews/approvals and payroll pre-check. |
Employees, Supervisors, HR Business Partners, HR Operations | Read | "Prepare an overview of past leaves and time off balances for my direct reports." |
|
View compensations and employment details Administrators, HR Business Partners, and payroll professionals can review employee-level compensation data to perform analysis. |
Administrators, HR Business Partners, HR Operations, Payroll admins | Read | "Provide a list with compensation details for employees in the Marketing department. Who hasn’t received a salary increase in the last 12 months? Who has the highest compensation?" |
|
View employee performance feedback and reviews Performance admins, supervisors, and leadership teams can retrieve performance feedback and reviews of employees to support calibration and other reviews. |
Supervisors, Leadership, HR Business Partners, HR Operations | Read | "What is the share of employees who received a 'truly distinctive' performance rating in 2026 when compared to the total employee count?" |
|
Approve time off (coming soon) Supervisors and HR Business Partners can view pending approvals for time off and request additional context to approve or request time off. |
Supervisors, HR Business Partners, HR Operations | Write (approval) | "Reject any sick day requests that don’t have a comment and add a rejection comment that prompts the requester to provide additional context." |
Important notes
Keep the following in mind when you use the Personio MCP server.
- Results are AI-generated and probabilistic. Always confirm important outputs before you act on data or approve changes, including Write actions like time off requests.
- The LLM that you connect to the MCP generates the results, not the MCP server itself. Like all LLMs, it can occasionally hallucinate or misinterpret data, and hallucination tendencies vary by model.
- The Personio MCP server isn't a replacement for automation or integrations. For permanent, scheduled integrations, like syncing data to another system, use the Personio API instead.
- Access mirrors your own permissions. The MCP server can only see and do what you're already allowed to see and do in Personio.
- Large queries are paginated. For large companies, your AI tool may need to page through data in batches, which can take longer and occasionally requires you to ask it to continue.
- Rate limits apply to heavy or scripted usage.
- Base employee and employment data is foundational to many tools. Turning off these core tools can cause other tools to return partial or no results. To restrict what connected AI tools can see, use attribute-level scoping instead of disabling core tools.
Data privacy and controls
Personio handles data in accordance with our Data Processing Addendum. Once your AI tool accesses data through the Personio MCP server, Personio can no longer trace how that AI tool uses it. From that point, the data is subject to your data privacy and processing agreement with your AI tool vendor.
- Access to data and capabilities is governed by the roles assigned to the authenticated user. The MCP server doesn't grant any access beyond what a user already has.
- The MCP server is disabled by default. Administrators need to enable it manually. Write access is a separate, additional opt-in toggle.
- Administrators can disable specific tools and hide specific person attributes at the Personio level. Disabled tools and restricted attributes are refused on Personio's side, regardless of the AI tool's own settings.
- Changes to the MCP setting are recorded for auditability, in the same way as any other transaction made in the app.