We're changing the way we manage long-term leaves. Examples of long-term leaves include parental leave, sabbaticals, and extended sick leave. Here's an overview of what's changing:
- Previously: You scheduled long-term leaves from the employee profile by using the three-dots icon and selecting Schedule leave.
- Now: You'll manage long-term leaves through your time off policies and time off periods.
No existing data is lost as part of this change. All leave periods already in your account remain visible and continue to run as before. The only thing that changes is where you go to create and manage long-term leaves from now on.
If your account has leave periods on record, read on to learn what you need to do. Most of these need no action. If you have leave periods scheduled for the future, you may need to review and remove them in favor of time off periods. You can do this when you update your time off policies to include compensation proration, status change, and PTO entitlement proration.
Why we're changing long-term leave management
Here's an overview of the changes we're making and how they'll improve your experience of managing long term leaves:
- One place for all leave management: We're bringing long-term leaves into Time off & attendance. All time off, both short- and long-term, will now run through one unified flow instead of two disconnected systems.
- Flexible configuration: We're replacing the hard-coded, Germany-only proration logic with customizable leave rules per policy. With this change, you can configure compensation, employee status, and PTO entitlement impact for any market or leave type.
- UI improvements: We're updating the time off policy UI for more clarity, including clearer examples and descriptions.
- Automated compliance: We're introducing automated compliance through market-specific policy configuration. With this change, you can avoid error-prone manual workarounds for non-German markets.
- Editing an assigned time off policy: You'll be able to edit an existing time off policy and set an effective date from when new settings apply. You'll no longer need to use the workaround of duplicating a policy and reassigning it. You'll see a changelog of assignments in the time off policy drawer, as well as other details on any changes made.
What's changing
The table below gives a summary of what to expect once the update is live for your account.
| What's changing | Before | After |
| The Schedule leave button | Opened a form to create a leave period. | Opens an onboarding modal that guides you to set up or edit time off policies. |
| Where existing leave periods appear | Only visible in the employee profile or on the Team calendar if a time off type was linked. | Appear on the Team calendar and the employee's Time off calendar with a "Leave period" label in dark gray. |
| Editing existing leave periods | Possible from the leave below the employee Status attribute. | You can now only view and delete existing leave periods from the Team calendar. You can no longer edit them until you've transitioned to the new system. |
| Time off entitlement proration | When using long-term leaves, automatic monthly calendar proration for paid vacation entitlement was only available with time off policies using the German policy template. Manual adjustments were required for all other cases. | Configurable paid vacation entitlement proration methods (daily, monthly calendar year, monthly rolling, or none). |
| Compensation impact | Hard-coded proration of base salary and recurring compensation for all leave periods. Manual salary adjustments were required for market-specific rules. | Configurable on/off setting for compensation proration (base: fixed salary and other recurring compensation to 0) and offset days relative to the time off start date. |
| Employee status | Automatically changed to "Leave" for all leave periods entered through the employee profile. The employee status listed leave periods and duration as an inline comment. | Configurable on/off setting per time off policy and offset days relative to the time off start date. The Status field in the employee profile no longer shows the leave period and duration. It directs you to the Team calendar instead. |
| Leave approval | No approval workflow | Follows the time off type's approval workflow (it defaults to auto-approve if none is set). Depending on the permissions you grant employees, they can request leaves themselves, or HR Managers can continue to manage them. |
Transition timeline
You'll gain access to the new long-term leave settings at the end of July, 2026. This applies to everyone who previously used the Schedule leave functionality.
Explore the new time off policies experience
You'll now manage long-term leaves through your time off policies. You can access time off policies in Settings > Time off & Attendance > Time off. Select a time off type to review its policies.
You can explore the full feature documentation here:
What you need to do
Editing your time off policies is required so that time off periods can create the downstream effects needed for long-term leave management. This includes compensation proration, status changes, and PTO entitlement adjustments, which the system applies flexibly and automatically based on your policy settings.
- Edit your Time off policy and enable the leave rules you need. This includes compensation proration, status changes, and entitlement rules.
- Review the impact of your changes shown in the policy edit flow before you confirm and save. Personio will list every overlapping leave entry detected that needs action and the number of employees impacted.
-
Go to the Team calendar using the links in the CSV from Step 2. Flagged leave periods appear with a "Leave period" label and distinct visual styling (dark grey).
- Delete each flagged leave period. If all your existing leave periods already ended or are currently ongoing, add long-term leave rules to relevant time off policies. see this section You can then start using policies for new time off periods right away.
- If you have existing leave periods with future start dates, do the following:
- Add long-term leave rules to relevant time off policies. see this section
- Fix any duplications flagged in the conflict summary. see this section
-
Review your long-term leave edge cases by checking the list of all long-term leave periods that we sent by email on 14.07.2026. This list shows every long-term leave period in your account. Some periods need a separate resolution path, described below.
- Open-ended leave periods: If a leave period in your overview has no end date, you must move it to the new system via time off policies before you can edit it.
- Leave periods you want to edit: If you need to change a leave period (for example, to update a date), you must first move it to the new system via time off policies.
- Leave periods without a linked time off type and period: If column J shows no linked time off period, and the leave period has an end date, you must move it to the new system via time off policies before you can edit it. If you do not need to edit this leave period, no action is required.
- Accounts not currently tracking absences via Time Off: Set up time off for your leave types, or continue making changes manually going forward.
Before you start, confirm the following permissions are in place:
- To add leave rules to time off policies, you need edit rights to the Account configuration > Time off section.
- To view and delete leave periods from the calendar, you need edit rights for People data > HR information.
- For employees to see their own time off periods in the calendar, they need at least View permissions for the relevant time off type.
Add long-term leave rules to relevant time off policies
We recommend that all customers add long-term leave rules to relevant time off policies. Follow these steps:
- Go to Settings.
- In the Time off & attendance section, click Time off.
- Select the time off type you use for long-term leaves, for example, parental leave or extended sick leave. Open the relevant policy.
- Click the three-dots icon to edit the policy.
- The following policy sections relate to long-term leaves: Compensation, Employee status, and Impact on paid time off. Learn more about long-term effects for time off policies. You can apply recommendations for common use cases using information from the relevant time off policy template.
- Set the effective date to Today. This is the recommended choice for most customers for the following reasons:
- A future date leaves a gap where new time off periods won't have the correct leave rules applied until the changes take effect.
- A date too far in the past flags more duplicate conflicts, creating cleanup you don't need.
-
If the system detects future leave periods that overlap with the new policy rules, a conflict summary appears. Read the section below for guidance.
- Review the policy changes and save.
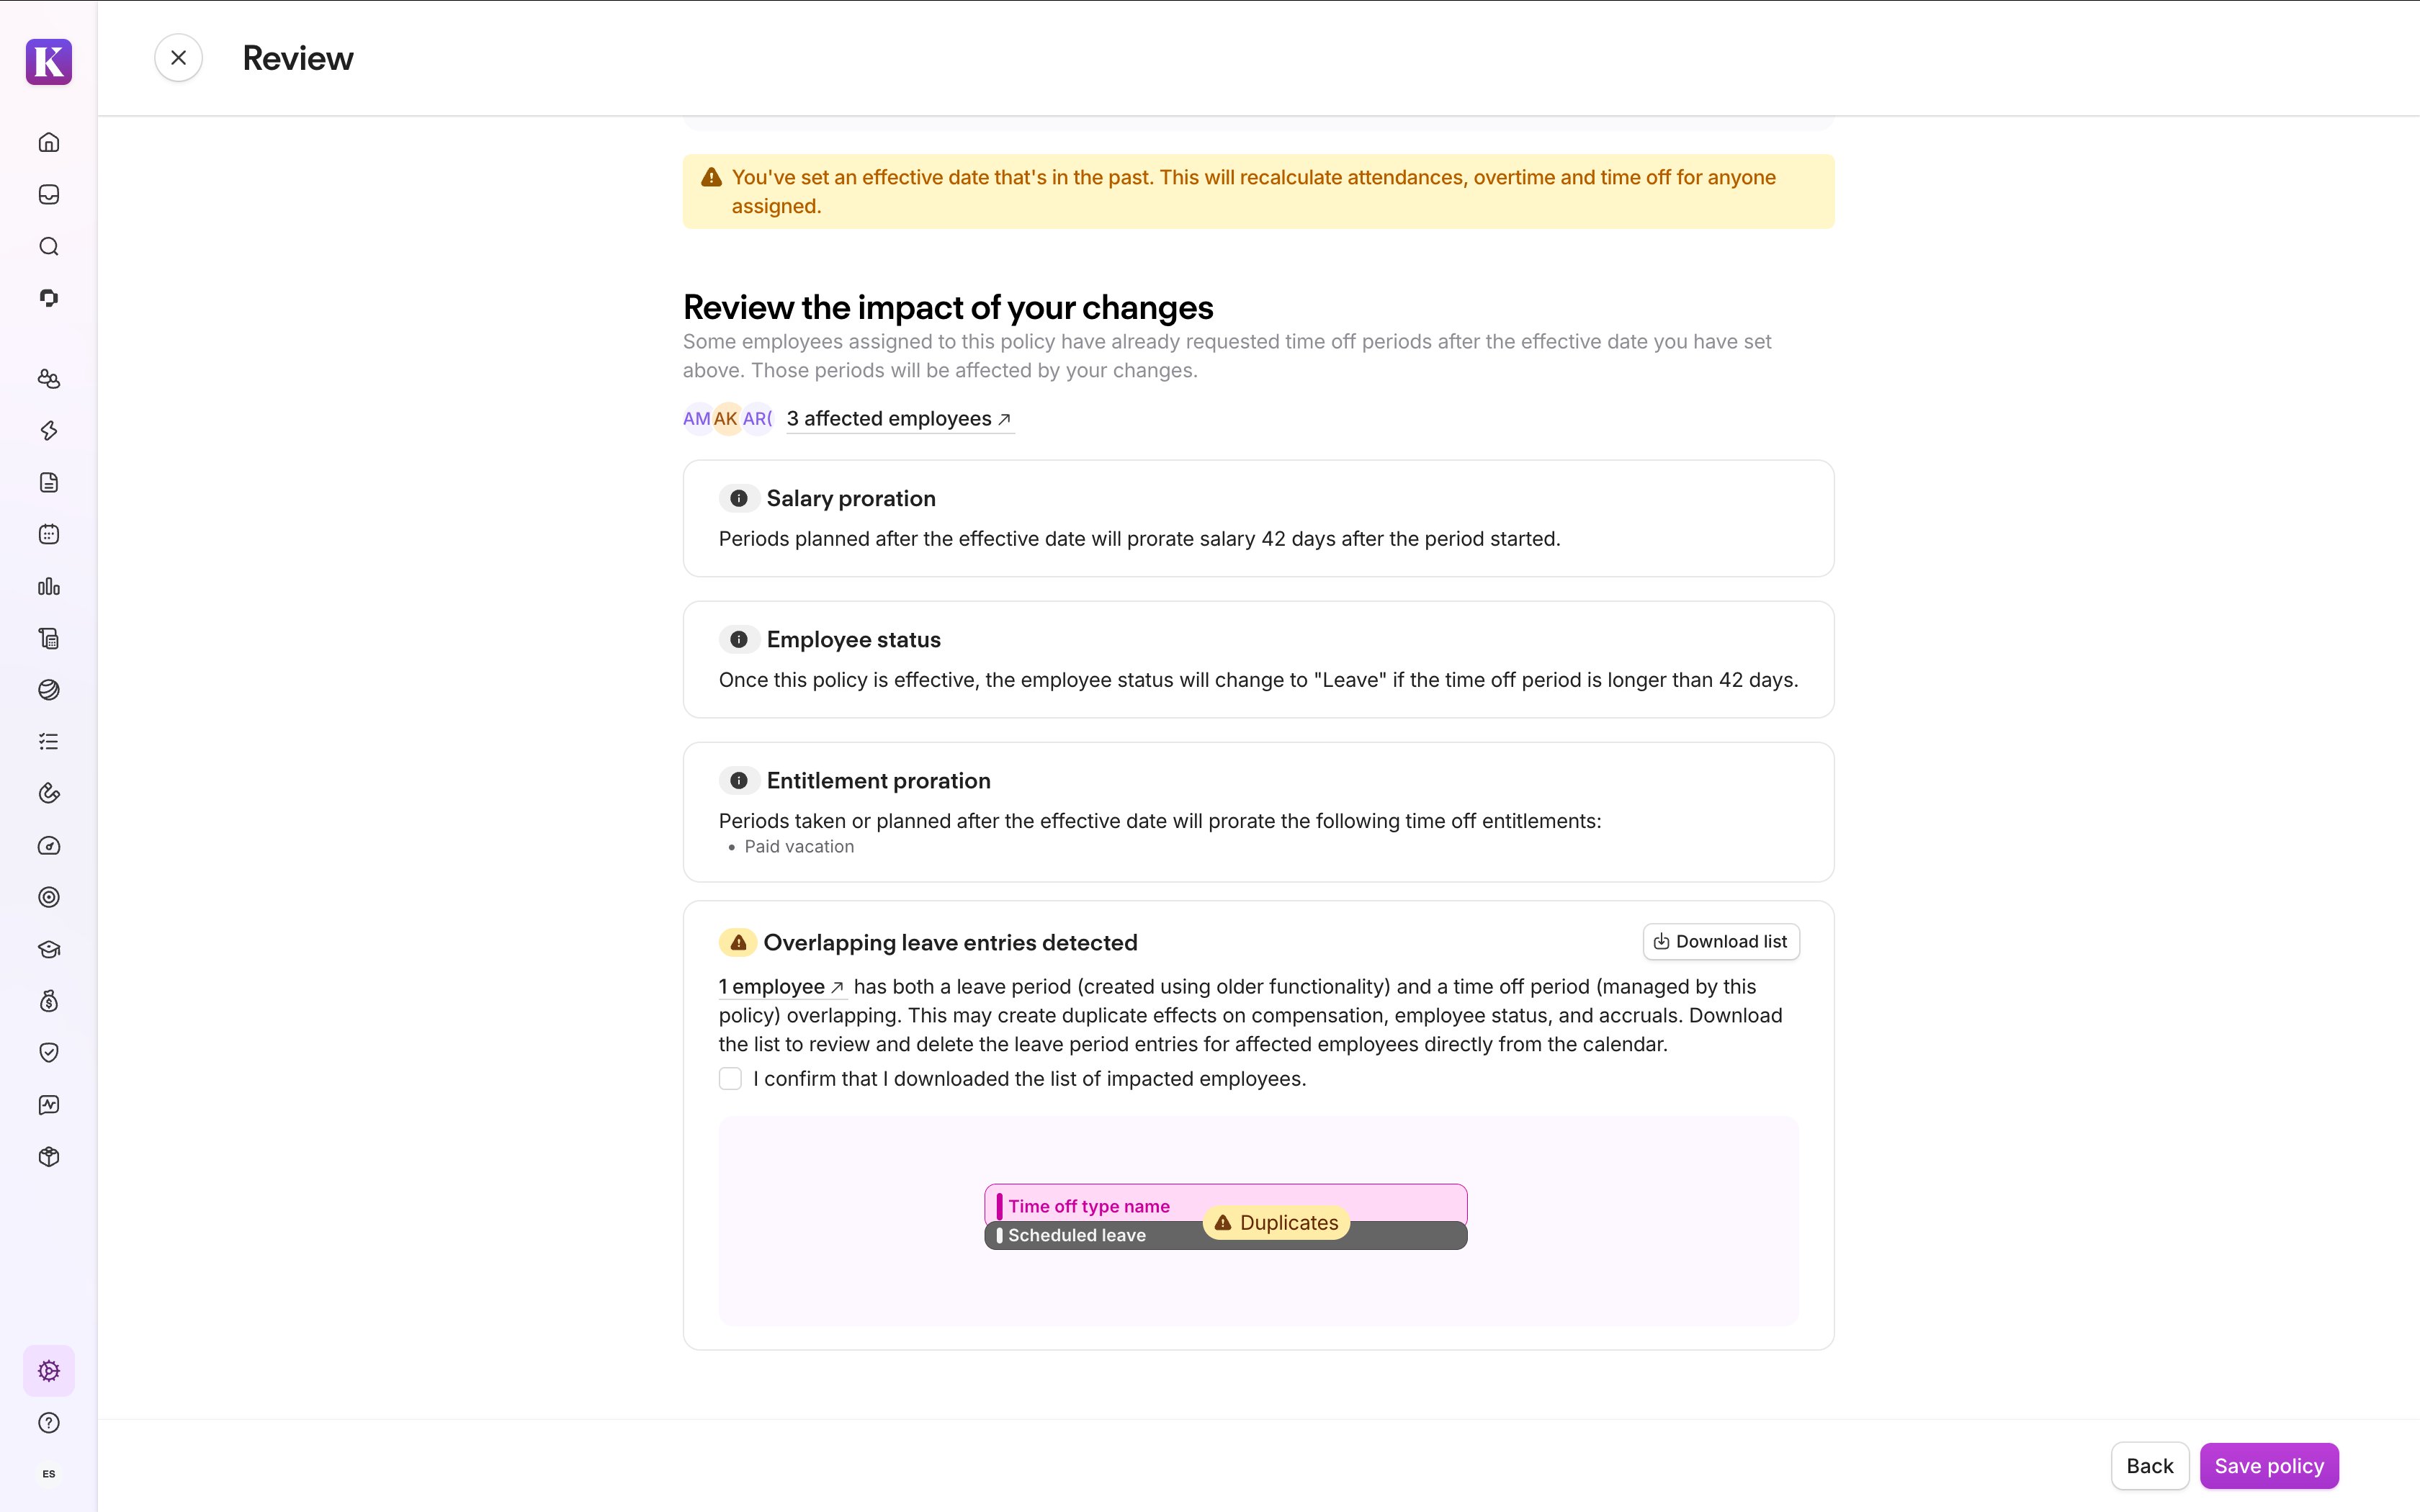
If you manage multiple leave types, for example, parental leave and extended sick leave, repeat this for each relevant policy.
Apply time off policy template recommendations
Time off policy templates recommend settings for Compensation, Employee status, and Impact on paid time off. However, these recommendations only apply when you create a new policy.
If you're editing an existing policy and are unsure what to set, follow these steps:
- Walk through the new policy creation flow for that time off type.
- Select your country's template and note the recommended settings (without saving).
- Apply those settings to your existing policy.
We don't recommend creating new policies, as this will result in more setup work for you.
What to do if a conflict summary appears
If your changes overlap with leave periods created using the old functionality, a conflict summary appears. It lists every leave period that needs action to ensure your employees' data stays accurate.
Why this matters: When you configure a policy with long-term leave rules, both the new policy and the existing leave period try to apply those rules at once. This effectively doubles the adjustment and can potentially cause errors in compensation, status, or time off entitlement.
The conflict summary includes:
- Each flagged leave period by employee and date range, and
- A downloadable CSV with direct calendar links for each affected employee.
If a conflict summary appears, follow these steps:
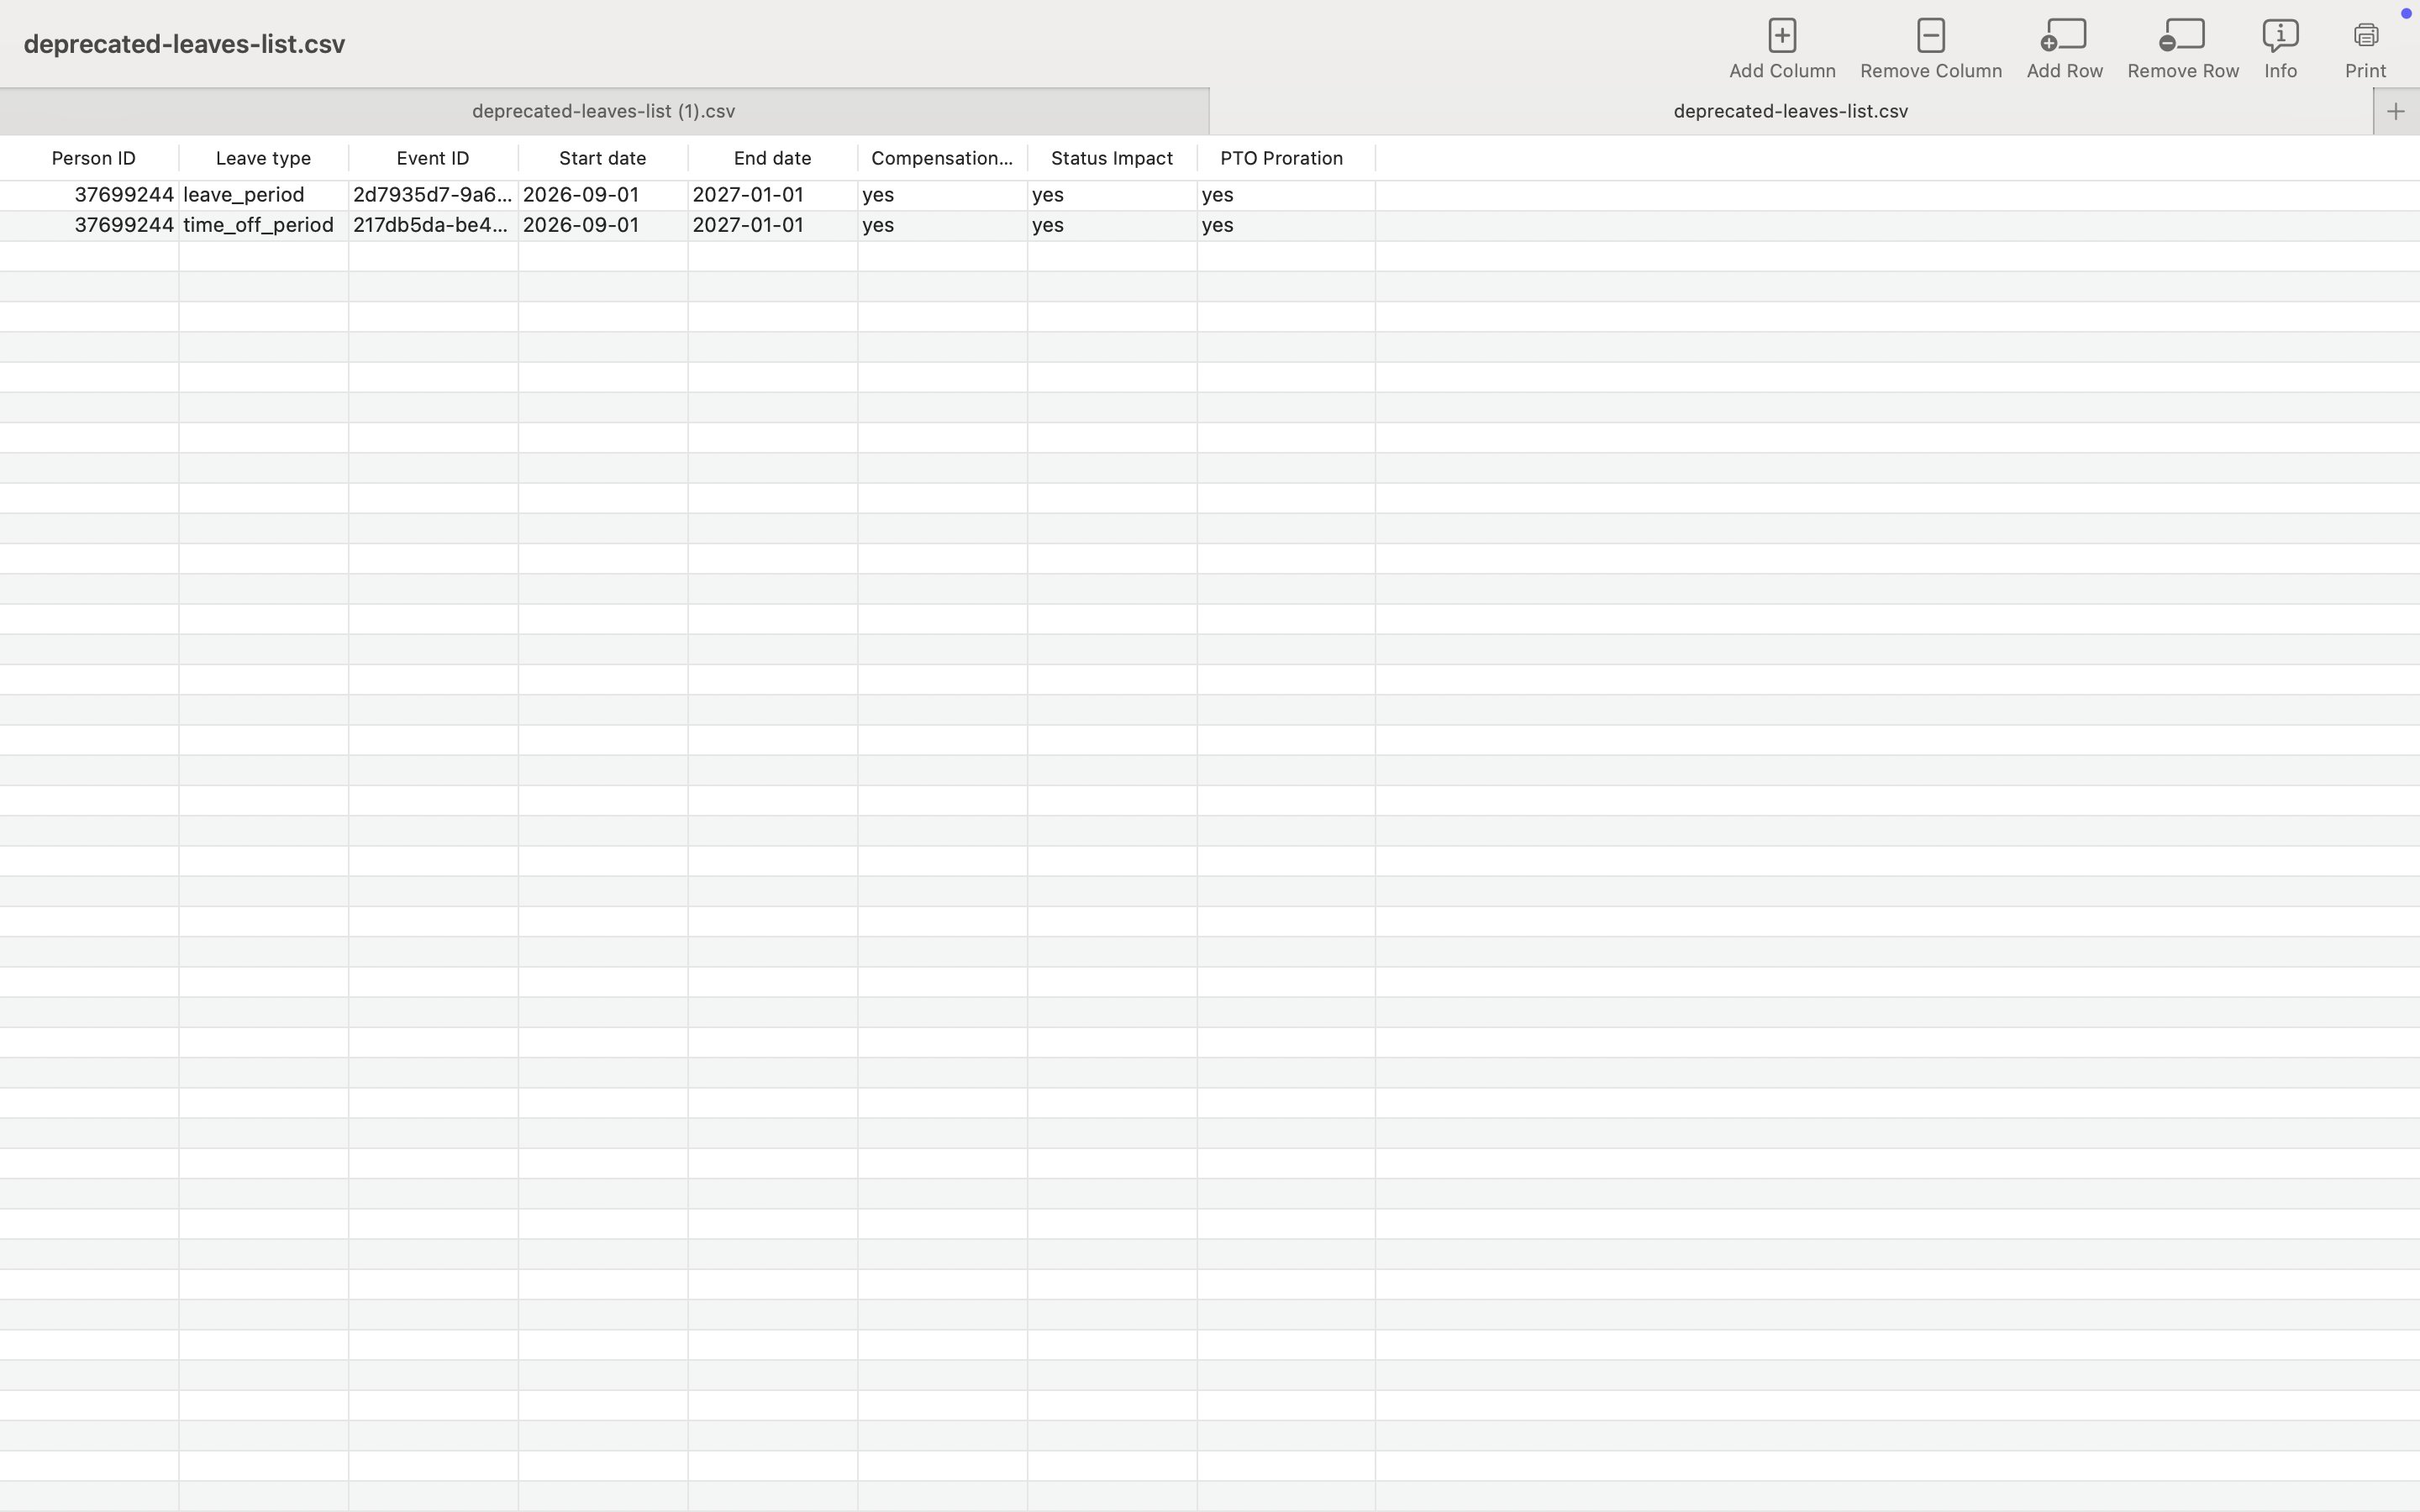
- Download the CSV and open it.
- Use the links to go to the flagged leave period in the Team calendar. The leave periods appear with a "Leave period" label and distinct styling, separate from regular time off periods.
- Delete each flagged leave period from the Team calendar.
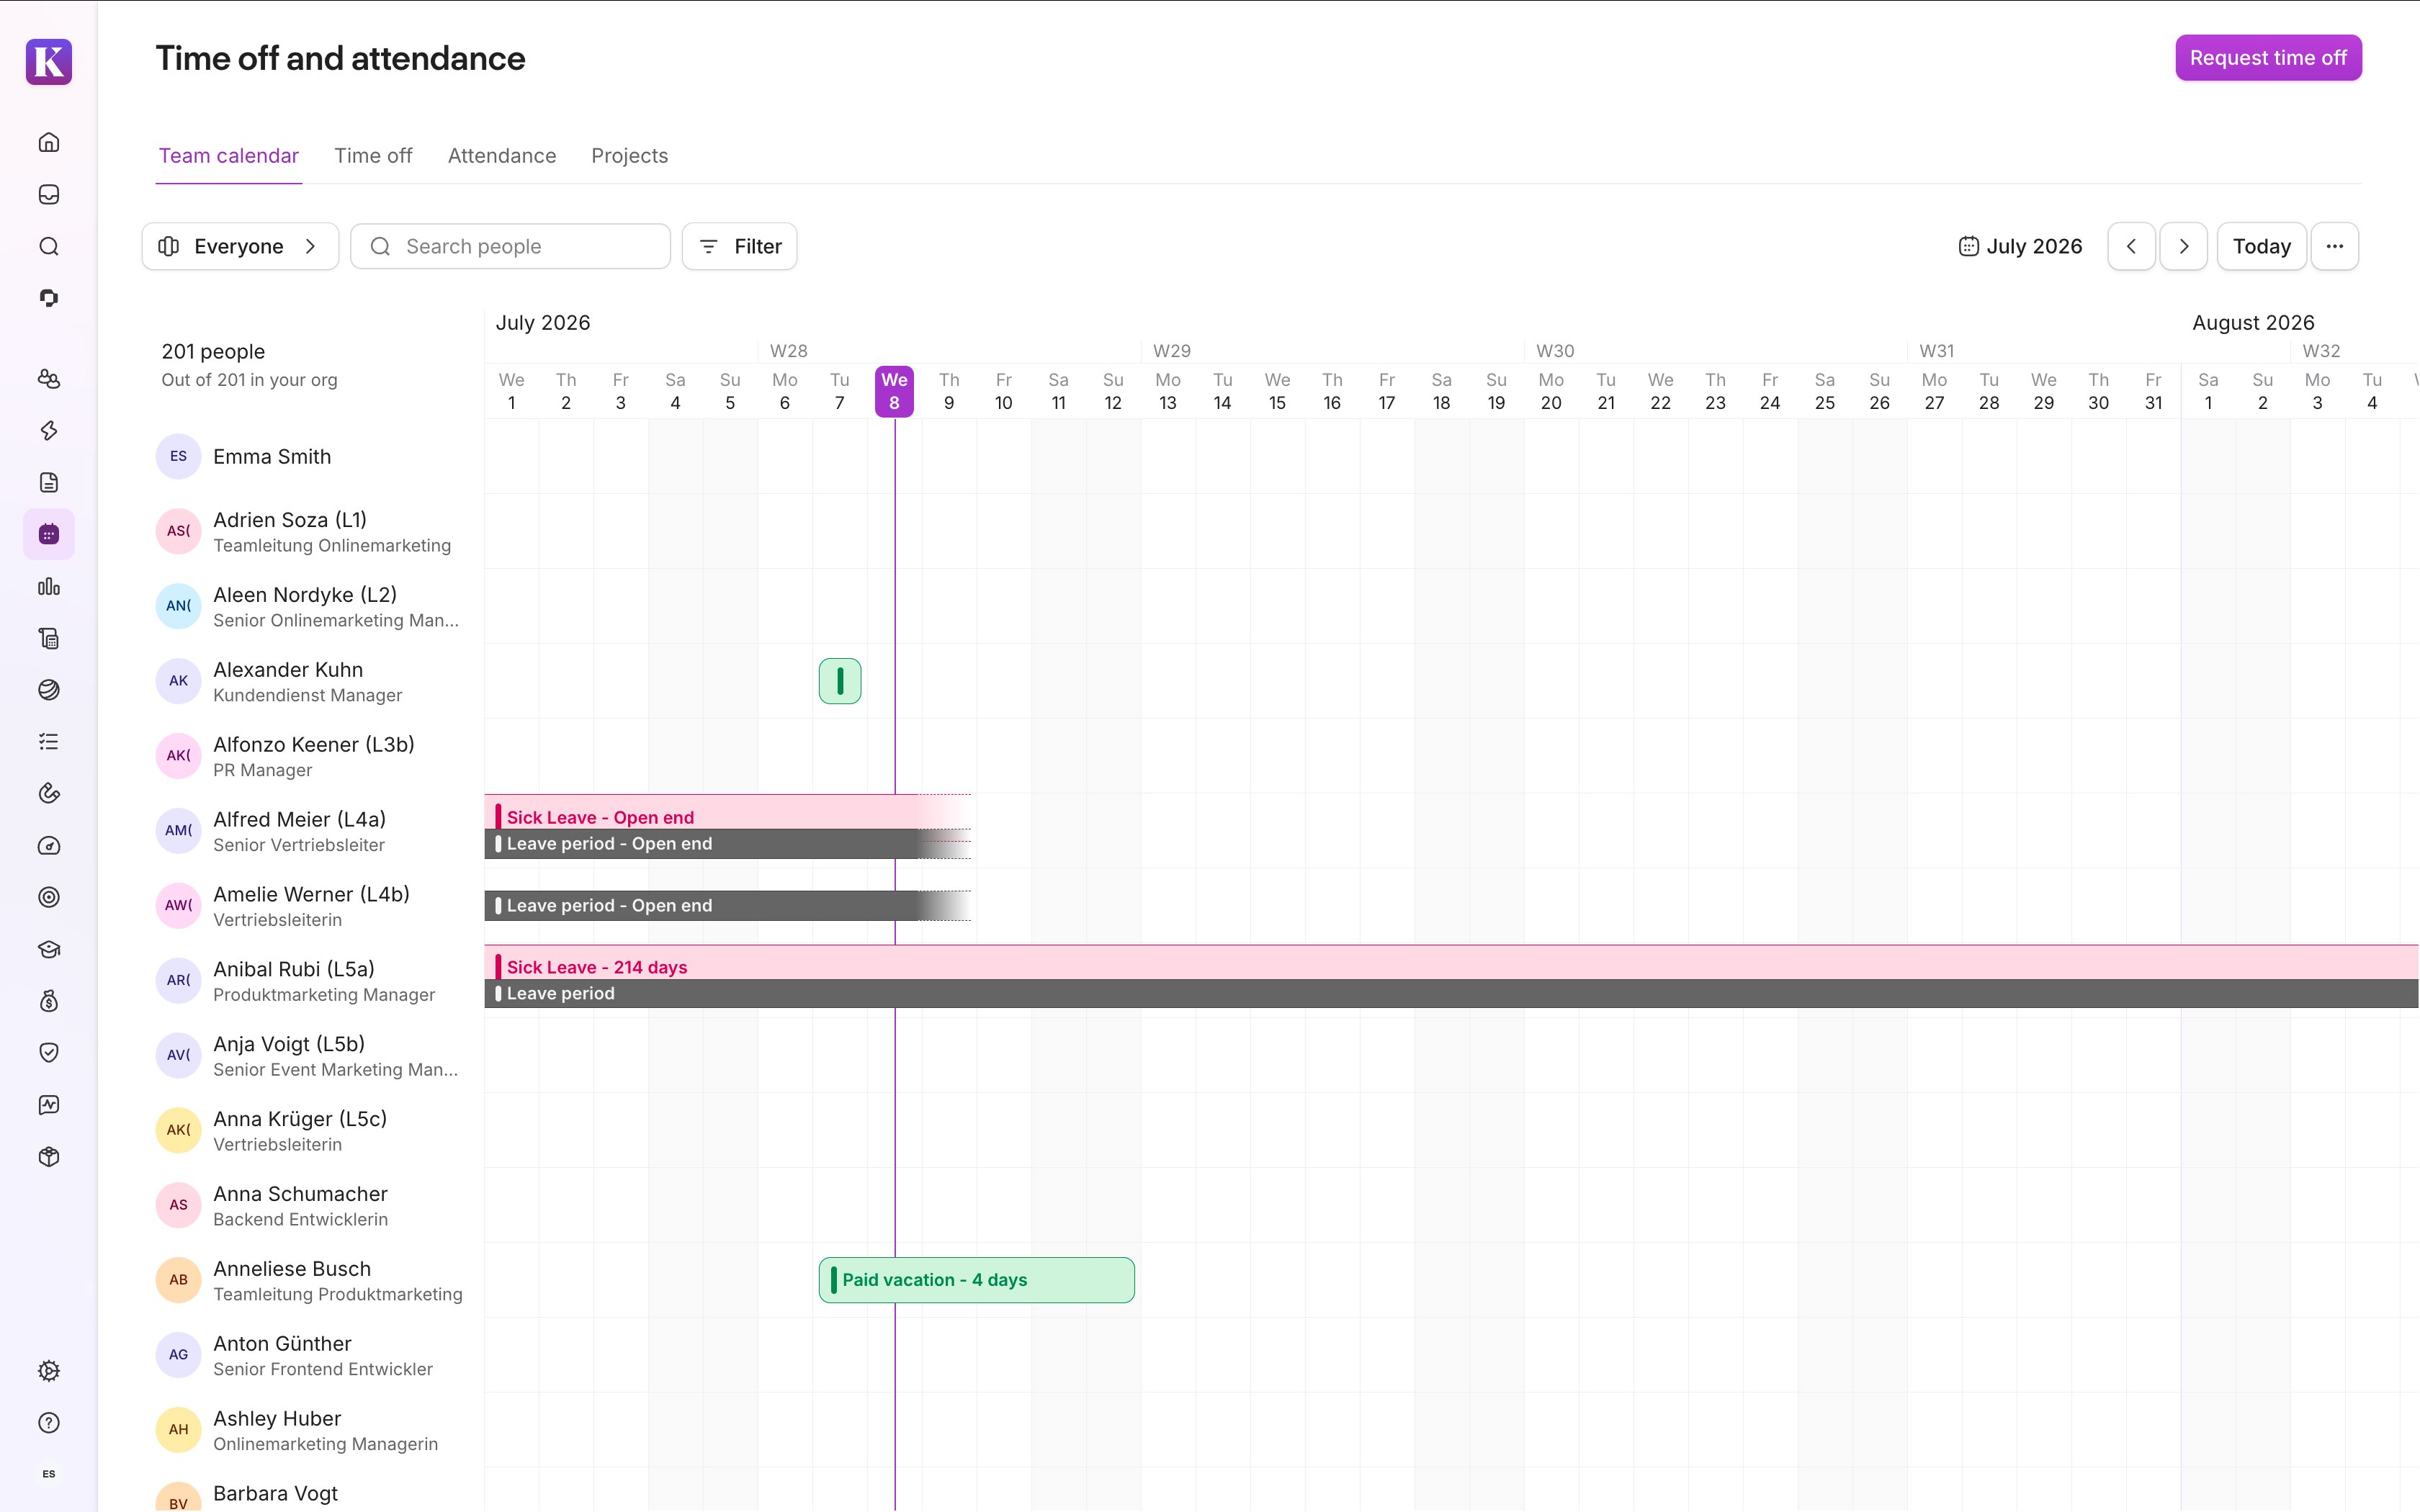
Now, only the time off period controls the effects on compensation proration, status, and PTO entitlement proration.
Example:
Julia has a parental leave period in the calendar from 1 August 2026 to 31 December 2026. It's linked to the "Parental Leave" time off type.
You edit the Parental Leave policy to add compensation proration, with an effective date of today (July 2026). The system detects that both the existing leave period and the new policy will apply proration rules to Julia's compensation. It flags it as a duplicate, and the conflict summary appears.
To fix the duplication, delete Julia's existing leave period. The time off period (her time off on the Team calendar) remains. The new policy handles proration automatically for the entire period, since the leave starts after the effective date.
Note the following:
- When deleting existing leave periods, the associated time off period for each employee stays intact, and you can still see it in the calendar. The system only removes the existing leave period and its hardcoded rules.
- The new policy rules take over from the effective date.
Review edge cases
Tip:
To identify employees affected by the edge cases below, check the CSV attached to the preannouncement email you received. It lists your account's existing leave periods as of the date the email was sent.
The edge cases described below won't appear in the conflict summary and require a separate resolution path.
Open-ended leave periods with no end date
Existing open-ended leave periods don't have an end date. This means that the system considers them as still "running". Because editing existing leave periods is no longer possible, you can't close them by adding an end date. The resolution depends on whether the leave period has a linked time off type and period. It also depends on when the leave period started.
Policy editing only allows effective dates back to the start of the previous period (1 January 2025 for this year). The following table shows the resolution path for this scenario.
| When the leave period started | Scenario | Resolution |
| January 2025 or later | Has a linked time off type and period |
These leave periods are covered by a standard policy edit. Follow these steps:
|
| January 2025 or later | Does not have a linked time off type and period |
Not covered by a policy edit, as no time off periods exist. Follow these steps:
|
Open-ended leave periods that started before January 2025 aren't covered by a policy edit. The following table shows the resolution path for this scenario.
| When the leave started | Scenario | Resolution |
| Before January 2025 | Has a linked time off type and period |
Follow these steps:
|
| Before January 2025 | Does not have a linked time off type or period |
Follow these steps:
|
Edit existing leave periods
You can no longer edit existing leave periods created in the old system. You might need to change the dates. For example, if the dates for a parental leave change. If so, make sure the employee has a time off period and a time off policy spanning the whole leave period. With the time off period, you can edit the dates. The policy applies the correct leave rules.
Time off policy rules only apply when a time off policy fully covers the time off period. If a policy with the new leave rules doesn't fully cover your time off periods, follow the steps for open-ended leave periods to edit the dates for your existing leave periods.
Leave periods without a linked time off type and period (with an end date)
If someone previously created a leave period without linking a time off period, it won't appear in the conflict summary. This is because no time off period exists for it to conflict with. If left in place, it continues running under the old system until its end date. This is fine if you don't need to edit the leave before it ends.
If you do need to make changes, resolve it as follows:
- Create a new time off policy with the required leave rules.
- Assign the time off policy to the employee effective from the relevant date.
- Create a new time off period for the employee from scratch. Use a bulk import if you have multiple cases to handle.
- Delete the existing leave period.
If you don't track your employees' absences using Time off
If you don't use the Time off functionality in Personio to track your employees' absences, you have two options to manage leave periods in Personio going forward:
- Recommended: Set up time off types and time off policies. This way, the system can handle compensation, status, and entitlement changes for long-term leaves automatically.
- Adjust your employees' compensation, status, and entitlement manually for any new long-term leave.
For Option 1, we recommend taking our Academy course on how to set up time off in Personio. This covers how to do the following:
- Create a time off type for each long-term leave category you manage. This might include, for example, parental leave, extended sick leave, sabbatical, etc.
- Create a time off policy for each type and configure the rules you need: Compensation proration, employee status changes, and entitlement impact.
- Assign the policy to employees and set necessary permissions, so everything's ready before you schedule anything new.
Once you've set up your policies, you can create new long-term leaves directly as time off periods in the employee's calendar.
FAQ
Option 1: Create a report in the Analytics area that filters for time off periods. Go to Analytics > Create report > select the Time off periods template. Filter for your preferred timeframe and time off types relating to long-term leaves (for example, maternity leave, sick leave, etc.).
Option 2: Create a filtered view in the Team calendar, using the filters to show the employees on leave during the current month.
Apply the following filters: 1) Out of office contains Out of office this month, 2) Long-term leave time off types.
Click Custom and save the current view.
There is one exception where a manual correction may still be needed on your end: If payroll has already been processed for the affected period and there's a mismatch between the settings the old leave period applied and what the new policy applies for the same period. For example, the old leave period had compensation proration enabled by default, and the new policy doesn't.