Note:
If you can't yet edit an assigned time off policy, the update hasn't rolled out to your account. We started the rollout on 27 July 2026 and are continuing it in stages.
We're changing the way we manage long-term leaves. Examples of long-term leaves include parental leave, sabbaticals, and extended sick leave. Here's an overview of what's changing:
- Previously: You scheduled long-term leaves from the employee profile by using the three-dots icon and selecting Schedule leave.
- Now: You'll manage long-term leaves through your time off policies and time off periods.
No existing data is lost as part of this change. All leave periods already in your account remain visible and continue to run as before. The only thing that changes is where you go to create and manage long-term leaves from now on.
If your account has leave periods on record, read on to learn what you need to do. Most of these need no action.
What's changing
You can no longer use the Schedule leave button to create long-term leave periods directly from the employee profile. Instead, long-term leave management, including compensation proration, employee status changes, and paid time off entitlement, moves into your time off policies. You now manage long-term leave alongside your existing short-term time off.
This change brings a few concrete benefits:
- One system instead of two: Short-term time off and long-term leave now run through the same time off policies, rather than a separate hard-coded flow.
- Rules that fit your market: You can now customize compensation, status, and entitlement rules per policy for any market or leave type. These were previously hard-coded rules, covering a limited set of use cases.
- Easier edits going forward: You can edit a policy that's already assigned to employees and set an effective date for when the new settings apply. You no longer need to duplicate and reassign policies to make a change.
This change doesn't affect existing long-term leave periods already in your account. You don't need to take action on these unless you need to edit one. Learn more about what you need to do below.
The table below gives a summary of what to expect once the update is live for your account.
| What's changing | Before | After |
| The Schedule leave button | Opened a form to create a leave period. | Opens an onboarding modal that guides you to set up or edit time off policies. |
| Where existing leave periods appear | Only visible in the employee profile or on the Team calendar if a time off type was linked | Appear on the Team calendar and the employee's Time off calendar with a "Leave period" label in dark gray. |
| Editing existing leave periods | Possible from the leave below the employee Status attribute. | You can now only view and delete existing leave periods from the Team calendar. You can no longer edit them until you've transitioned to the new system. |
| Time off entitlement proration | When using long-term leaves, Automatic monthly calendar proration for paid vacation entitlement was only available with time off policies using the German policy template. Manual adjustments required for all other cases. | Configurable paid vacation entitlement proration methods (daily, monthly calendar year, monthly rolling, or none). |
| Compensation impact | Hard-coded proration of base salary and recurring compensation for all leave periods. Manual salary adjustments required for market-specific rules. | Configurable on/off setting for compensation proration (base: fixed salary and other recurring compensation to 0) and offset days relative to the time off start date. |
| Employee status | Automatically changed to "Leave" for all leave periods entered via the employee profile. Listed leave periods and duration as an inline comment | Configurable on/off setting per time off policy and offset days relative to the time off start date. The Status field in the employee profile no longer shows the leave period and duration. It directs you to the team calendar instead. |
| Leave approval | No approval workflow | Follows the time off type's approval workflow (defaults to auto-approve if none is set). Depending on the permissions you grant employees, they can request leaves themselves, or HR Managers can continue to manage them. |
| Time off policy flow | No rules for long-term leave | We've redesigned the time off policy flow and added the new settings for long-term leave rules. Learn more about the new time off policies experience. |
| Editing assigned time off policies | No possibility to edit assigned time off policies | You can now edit time off policies that are assigned to employees. |
Transition timeline
We started the rollout of the new long-term leave settings on 27 July 2026, and we're continuing it in cohorts. This applies to everyone who previously used the Schedule leave button.
What you need to do
You need to edit your time off policies so that time off periods can create the downstream effects needed for long-term leave management. This includes compensation proration, status changes, and PTO entitlement adjustments. The system applies these effects flexibly and automatically based on your policy settings. You only need to edit time off policies that are currently in use for time off types you want to use for long-term leave periods. This might include policies for time off types like parental leave, sabbatical, or maternity leave.
If you can't yet edit an assigned time off policy, it means we haven't rolled out the new settings to your account yet. We started the rollout on 27 July 2026 and are continuing it in stages.
Before we roll out the change
- Confirm you have the right permissions in place:
- Edit rights for Account configuration > Time off. You need these permissions to add leave rules to time off policies.
- Edit rights for People data > HR information. You need these permissions to view and delete the gray leave periods from the calendar.
- For employees to see their own time off periods in the calendar, you need to grant them at least View rights for the relevant time off type under People data > Time off (via their employee role).
- Edit rights for the relevant time off type under People data > Time off. You or other HR Managers need these permissions to create and edit long-term leaves in the future. In other words, these permissions let you manage time off periods for a specific time off type.
- If you don't currently use Time off in Personio to track absences, decide whether you want to start or continue managing long-term leave changes manually going forward.
After the update is live
- Edit the time off policies you currently use for long-term leave types. The edits involve setting up the new Compensation, Employee status, and Impact on paid time off rules.
- Clean up any conflicts: If the rules you add overlap with existing leave periods, Personio flags them in a conflict summary. Resolve each flagged period before moving on.
- Check whether you need to edit any existing leave periods using the file we sent you via the preannouncement email. This might include leave periods with no end date, or ones where a date needs to change. You can no longer edit these directly after the update, so you need to move them to the new system first.
Add long-term leave rules to relevant time off policies
Time off types related to long-term leave might include, for example, parental leave, sabbatical, and maternity leave. For these time off types, we recommend adding long-term leave rules to all time off policies that are currently assigned to employees. We recommend editing existing time off policies, not creating new ones.
Follow these steps:
- Go to Settings.
- In the Time off & Attendance section, click Time off.
- Select the time off type you use for long-term leaves, for example, parental leave or extended sick leave.
- Under Time off policies, open the relevant policy.
- Click the three-dots icon to edit the policy.
- The following policy sections relate to long-term leaves: Compensation, Employee status, and Impact on paid time off. Configure each of these settings according to your needs. Refer to this article section on long-term effects for time off policies for details on each setting. When configuring your long-term leave settings, keep the following points in mind:
-
Personio Payroll:
- If none of your legal entities use Personio Payroll, you can configure the Compensation step as normal.
- If some, but not all, of your legal entities use Personio Payroll, you can still configure the Compensation step. However, it won't take effect for employees under the Personio Payroll legal entities. For them, the system automates compensation proration based on the additional questions you answer in the time off request flow.
- If all of your legal entities use Personio Payroll, the Compensation step isn't available to configure. Instead, compensation proration is automated based on the additional questions you answer in the time off request flow.
- If you use DATEV, the Compensation step is available for you to set up. How compensation is prorated depends on whether you've configured the policy to include compensation proration and whether additional questions are activated.
- After you save changes to the Employee status setting in a policy, it can take up to 30 minutes before the updated status is reflected on the employee's profile.
- The time off policy needs to be assigned across the entire time off period for these settings to apply to it. If the assignment doesn't span the full period, the compensation, status, or entitlement rules won't apply.
-
Personio Payroll:
- Set the effective date to Today. This is the recommended choice for most customers for the following reasons:
- A future date leaves a gap where new time off periods won't have the correct leave rules applied until the changes take effect.
- A date too far in the past flags more duplicate conflicts, creating cleanup you don't need.
- If the system detects future leave periods that overlap with the new policy rules, a conflict summary appears. Read the section below for guidance. If no conflicts show, simply save the policy, and you are done.
- Review the policy changes and save.
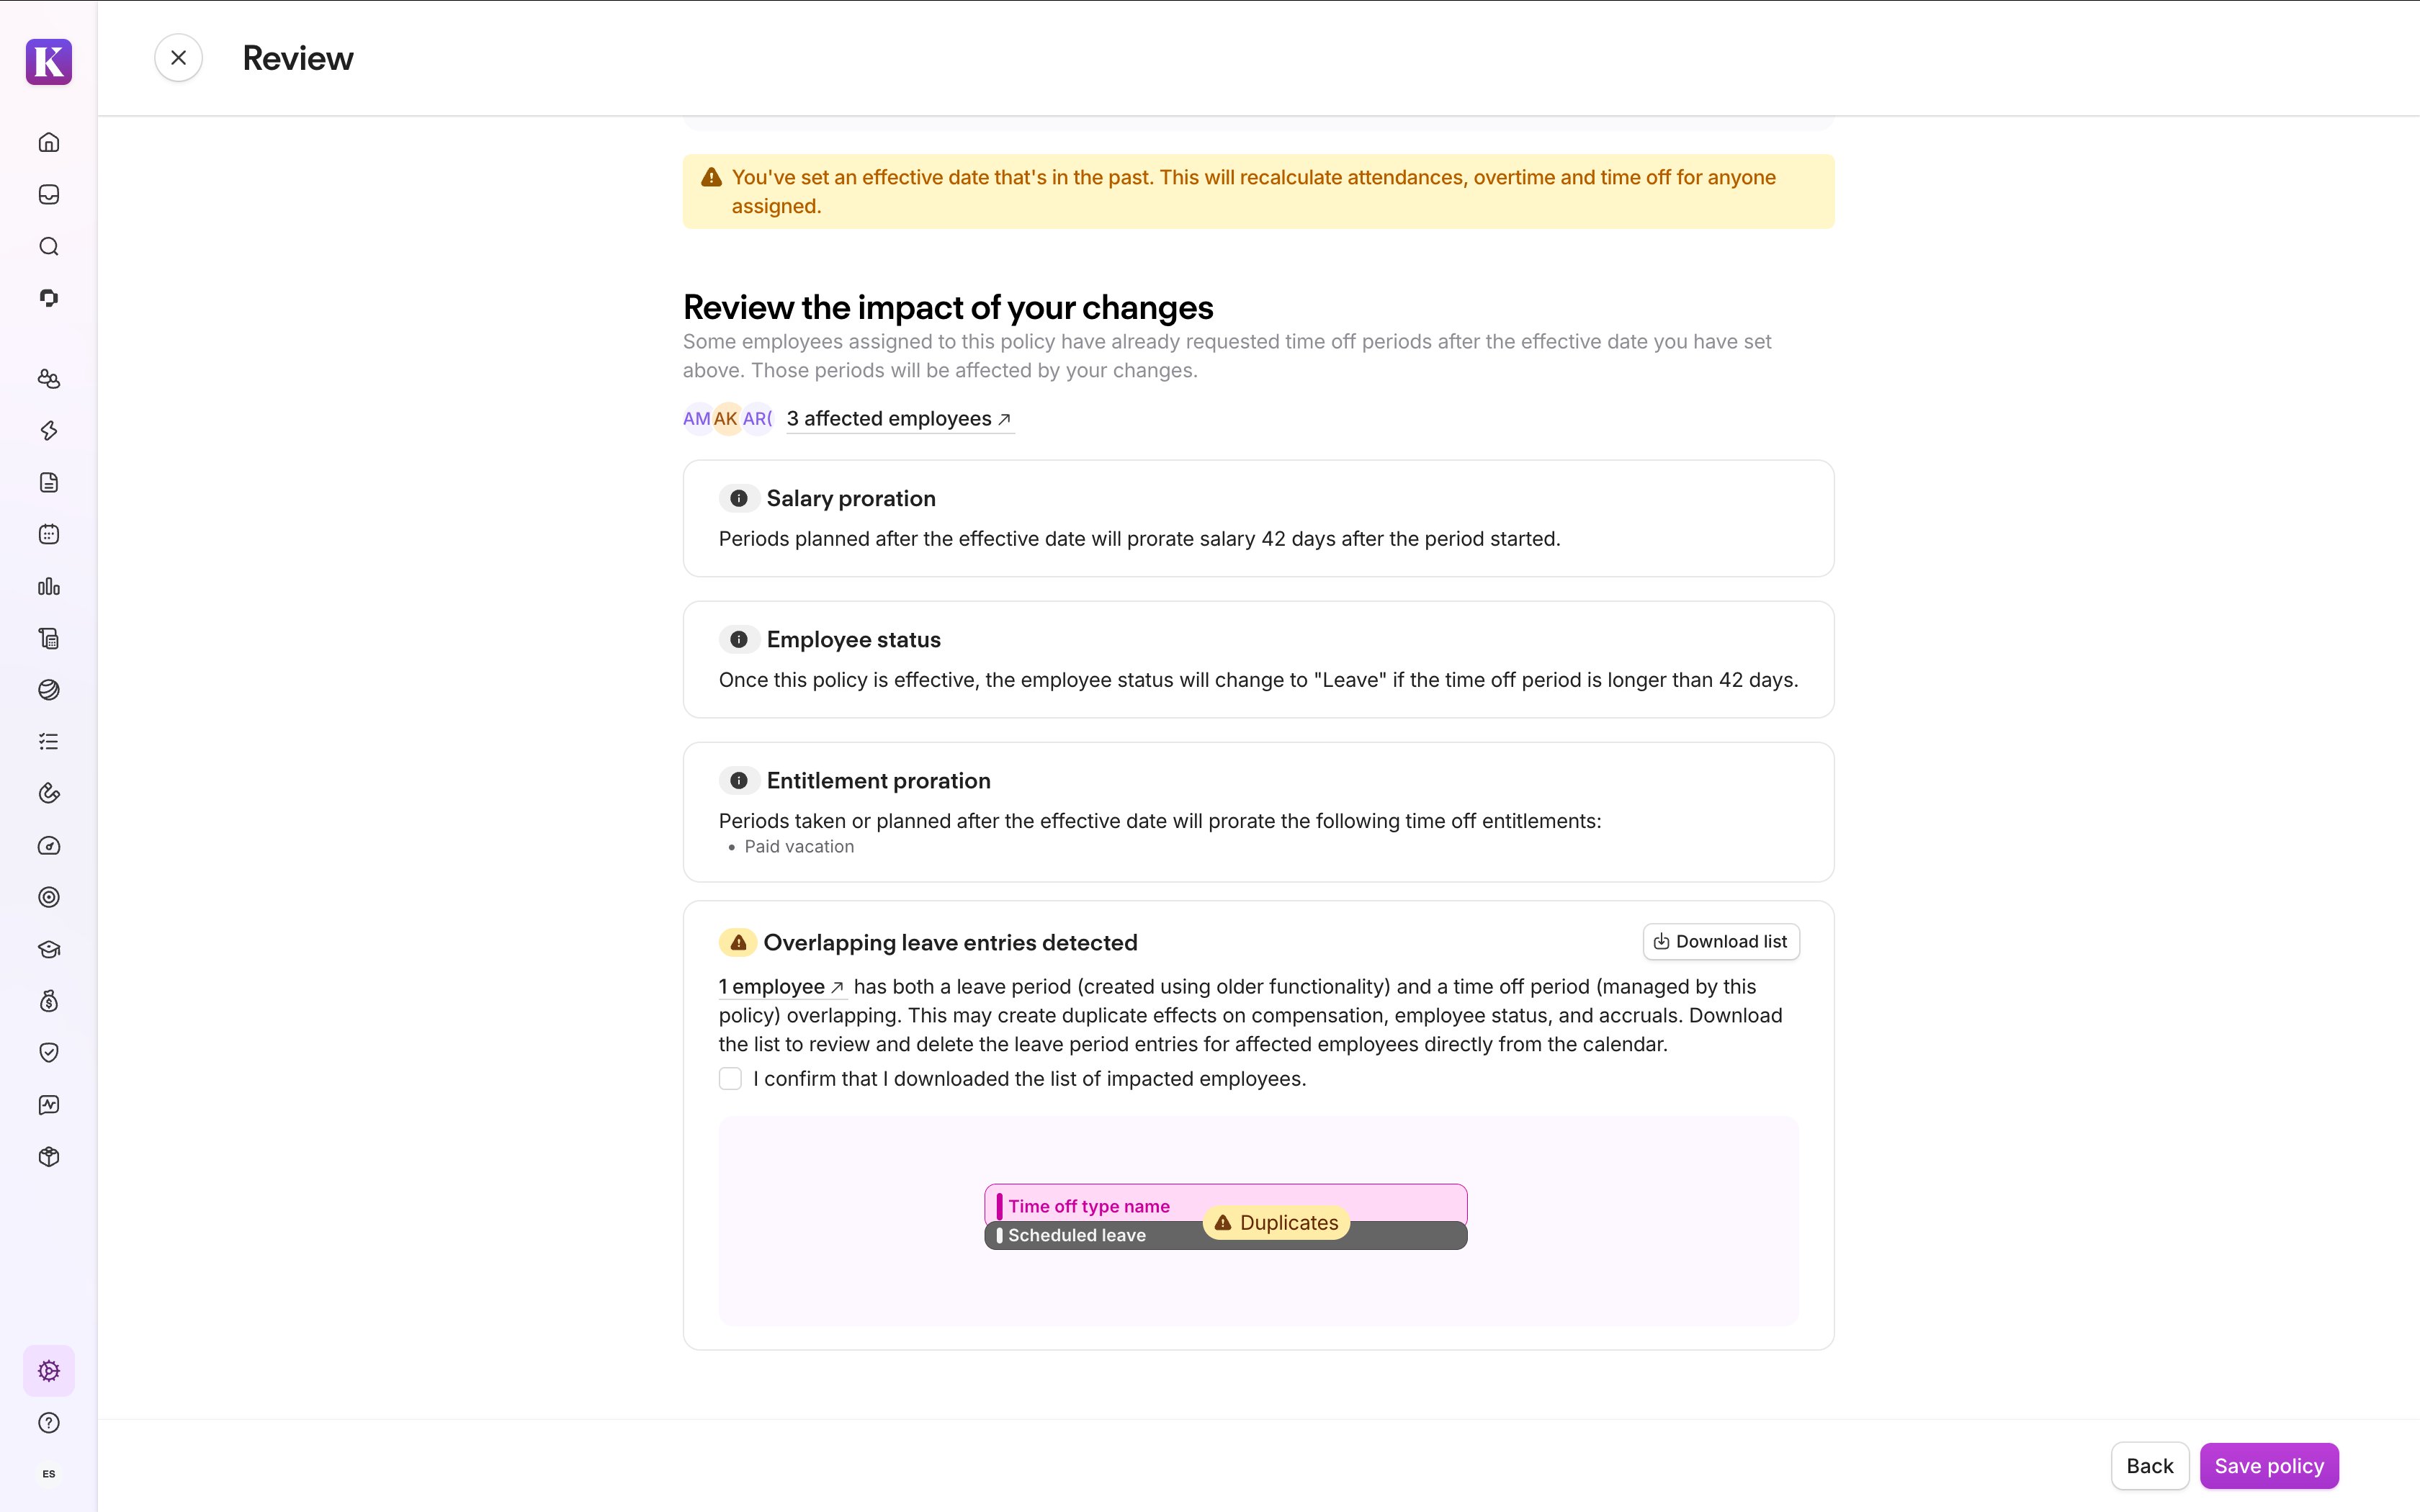
If you manage multiple leave types, for example, parental leave and extended sick leave, repeat the steps above for each relevant policy.
Apply time off policy template recommendations
Time off policy templates recommend settings for Compensation, Employee status, and Impact on paid time off. However, these recommendations only apply when you create a new policy.
If you're editing an existing policy and are unsure what to set, follow these steps:
- Walk through the new policy creation flow for that time off type.
- Select your country's template and note the recommended settings (without saving).
- Apply those settings to your existing policy.
We don't recommend creating new policies, as this will result in more setup work for you.
DATEV - Compensation proration scenarios
If you use DATEV, the Compensation step is available for you to set up in time off policies. When managing long-term leaves, compensation proration can be triggered by two sources: additional questions in the time off request flow and policy compensation settings. Understanding how these elements interact is essential to avoid unintended proration outcomes.
The table below shows how compensation is prorated depending on your policy configuration and whether additional questions are activated and answered:
| Policy Configuration | Additional Questions: Activated & Answered (unpaid code) | Additional Questions: Activated but Not Answered (paid code) | Additional Questions: Not Activated |
| Policy has compensation proration enabled | Policy prorates within its defined range (e.g., "from day 5"). Additional questions prorate any days outside this range. | Policy prorates the entire period. | Policy prorates the entire period. |
| Policy does not have compensation proration | Additional questions prorate the entire period. | No proration occurs. | No proration occurs. Exception for time off category maternity or parental leave, see below. |
Important considerations:
- If compensation is not prorated based on the additional questions in the time off request flow, compensation will still be prorated according to the compensation rules set in the time off policy.
- For absences with the time off category maternity or parental leave, automatic codes are still generated depending on employee attributes (such as gender), even if neither additional questions are activated, nor a time off policy with compensation proration activated is assigned.
Example: An employee takes leave for 30 days. Your policy says "apply compensation proration from day 5." If the employee answered additional questions (unpaid code), days 0 - 4 are prorated by the answers to the additional questions, and days 5 - 30 are prorated by the policy. If additional questions were not answered (paid code), compensation is prorated according to the policy from days 0 - 30.
What to do if a conflict summary appears
If your changes overlap with leave periods created using the old functionality, a conflict summary appears. It lists every leave period that needs action to ensure your employees' data stays accurate.
Why this matters: When you configure a policy with long-term leave rules, both the new policy and the existing leave period try to apply those rules at once. This effectively doubles the adjustment and can potentially cause errors in compensation, status, or time off entitlement.
The conflict summary includes:
- Each flagged leave period by employee and date range, and
- A downloadable CSV with direct calendar links for each affected employee.
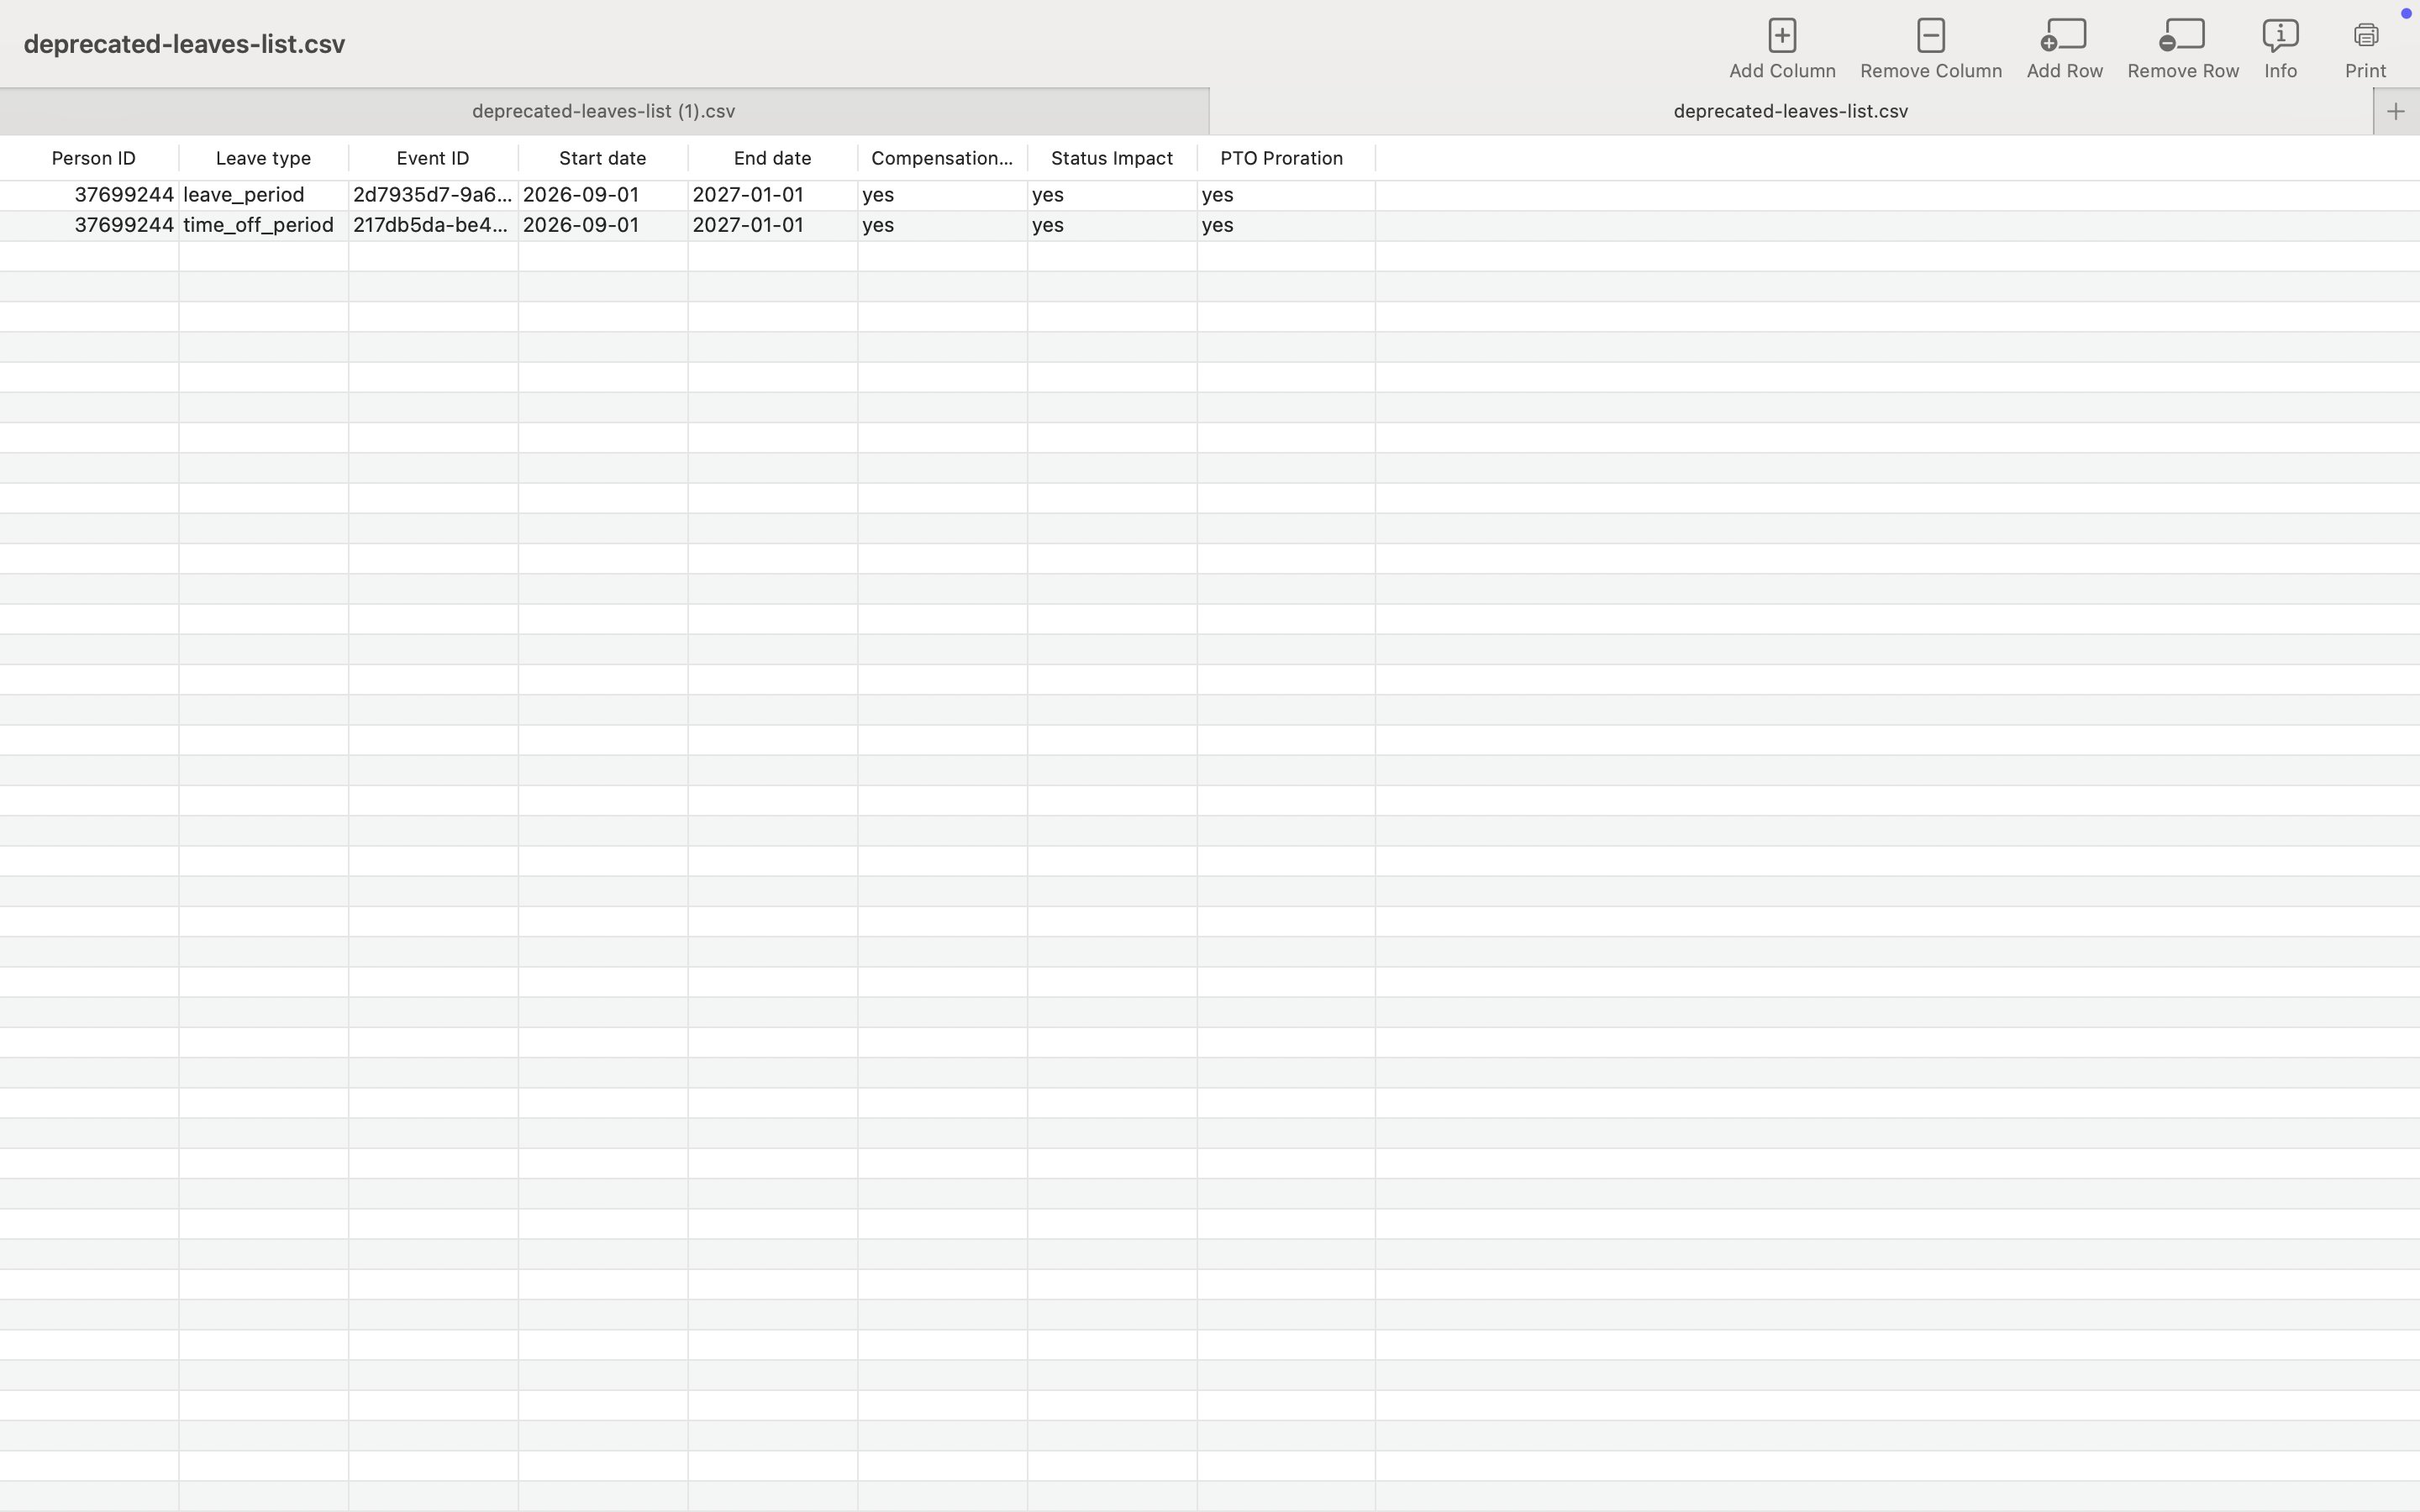
If a conflict summary appears, follow these steps:
- Download the CSV and open it.
- For each row that contains "leave_period" in column B, use the link in column C to go to the flagged leave period in the Team calendar. The leave periods appear with a gray "Leave period" label and distinct styling, separate from regular time off periods.
- Delete each flagged leave period from the Team calendar. This doesn't delete the time off period.
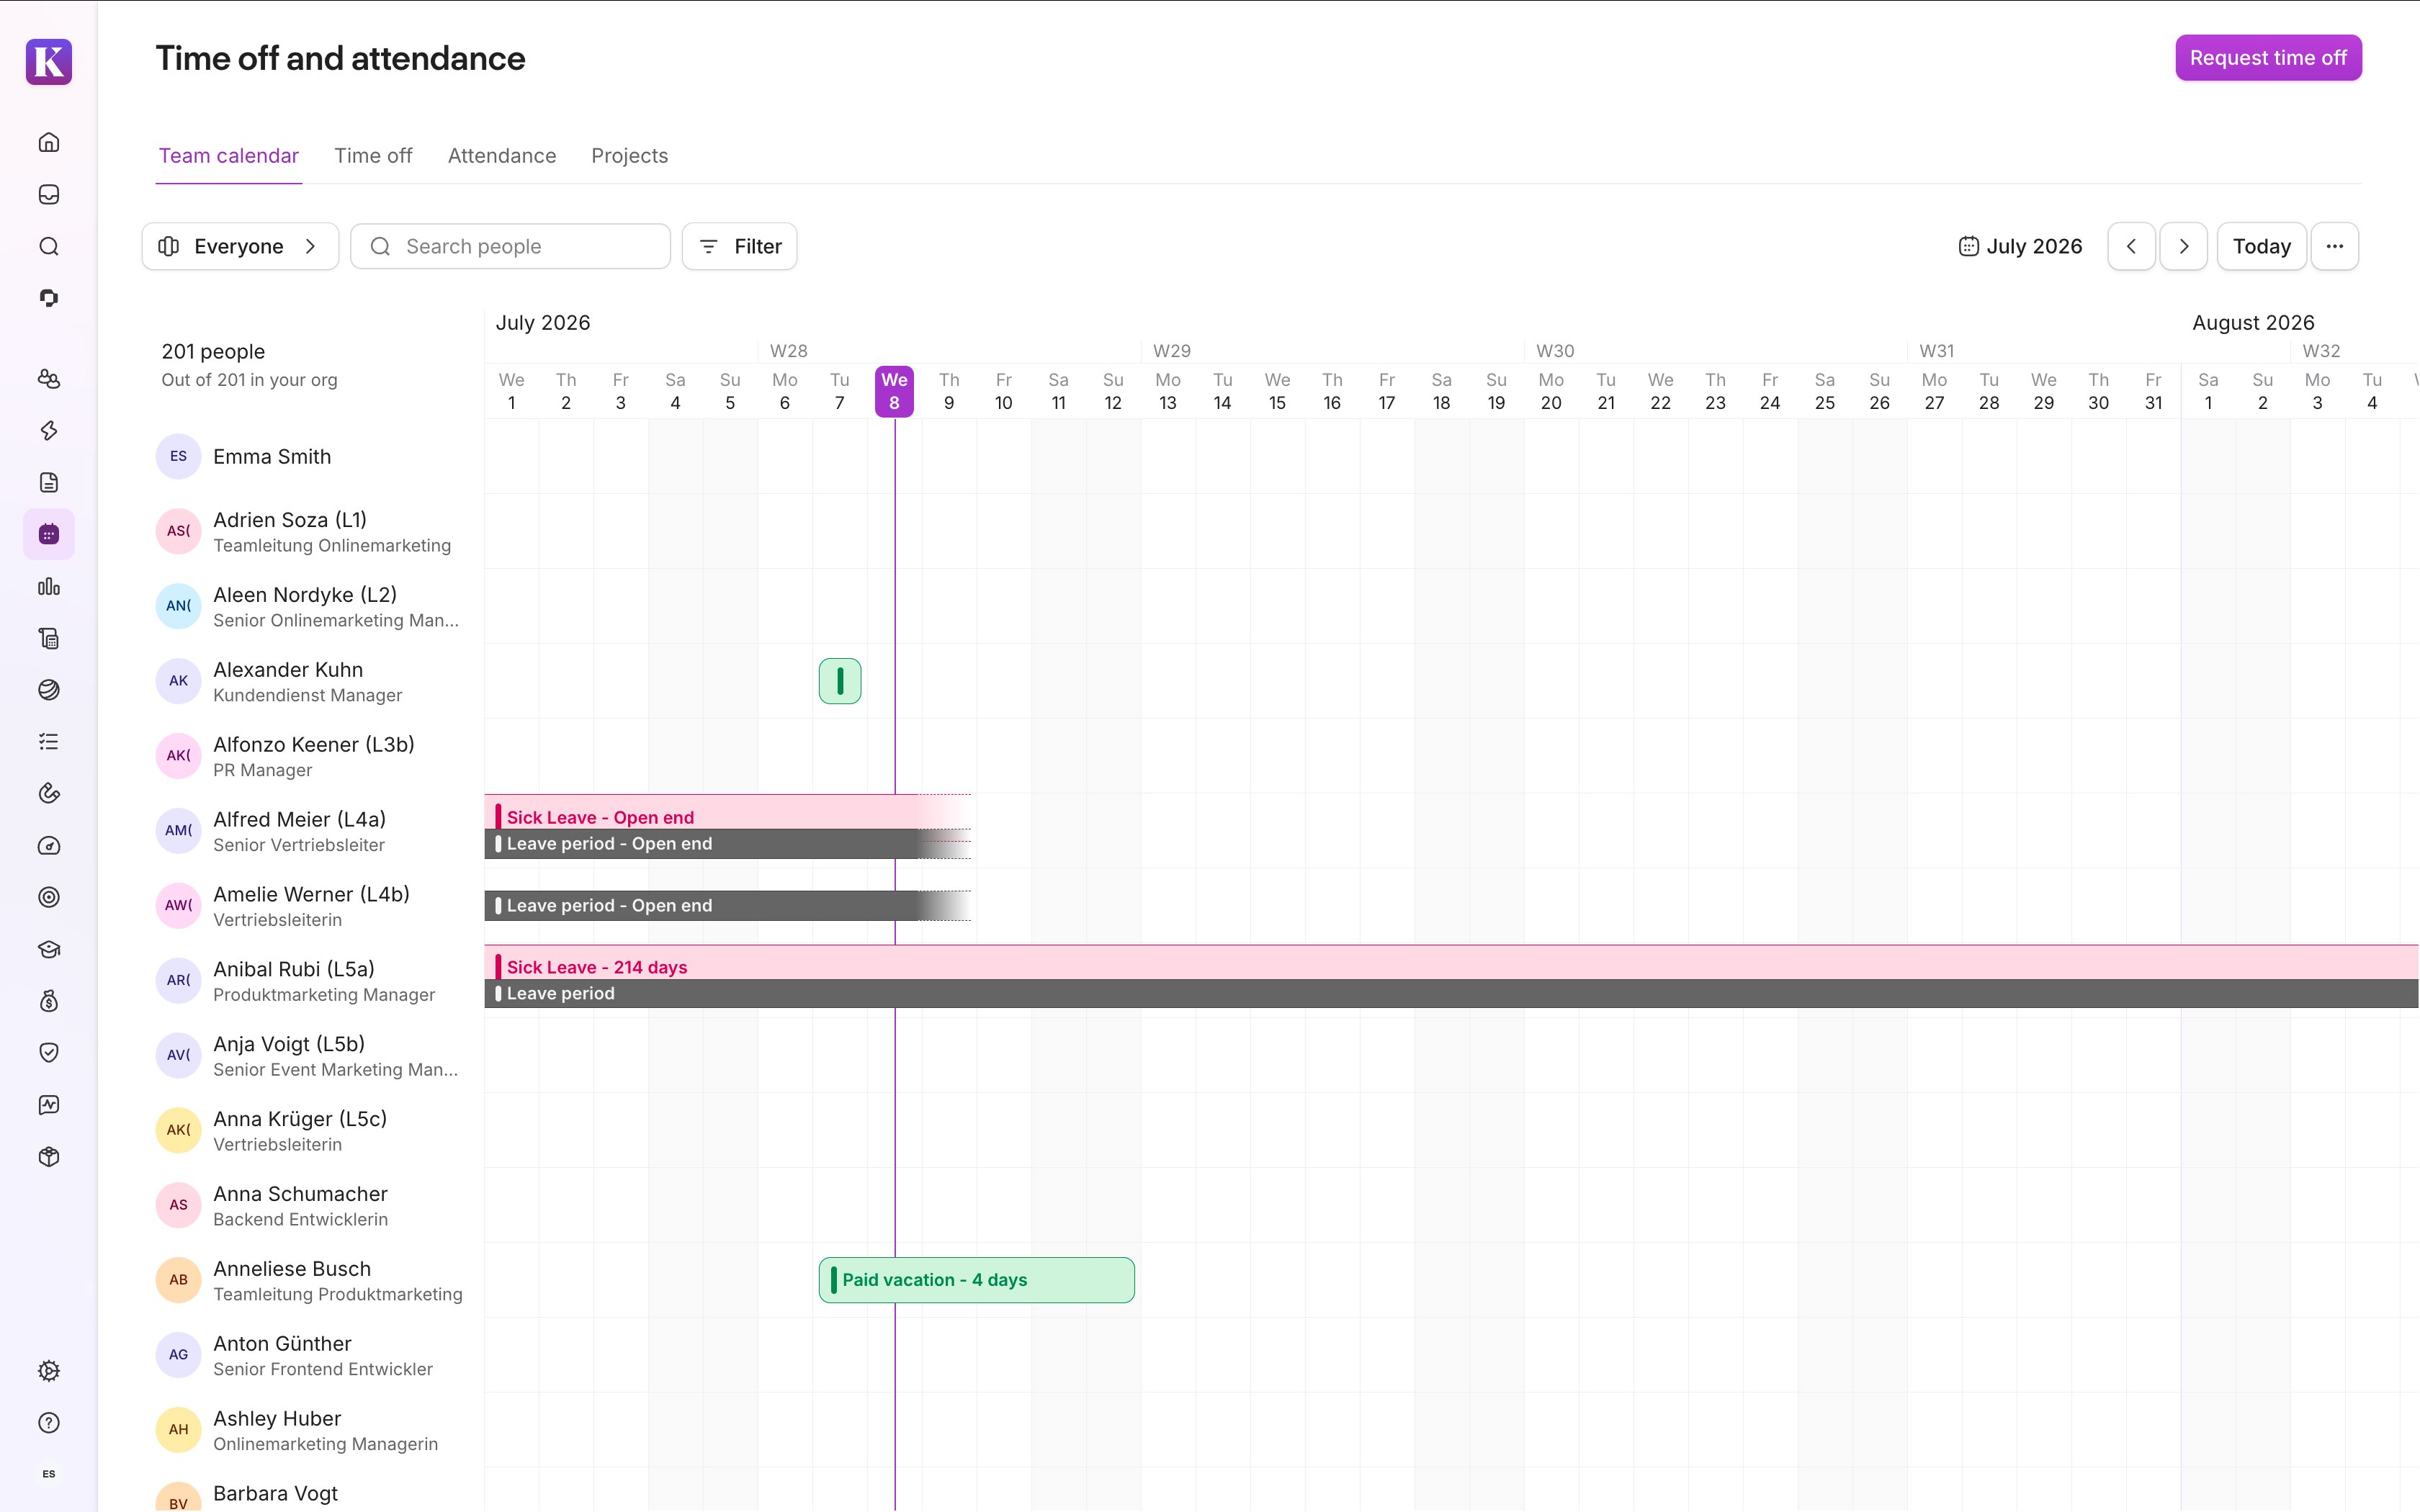
Important:
Don't delete the periods marked as "time_off_period". These are the time
off periods where your new time off policy settings apply going forward.
Only delete leave periods that are listed in the CSV files or that the Help
Center specifically instructs you to delete.
The remaining time off period now controls the effects on compensation proration, status, and PTO entitlement proration.
Example:
Julia has a parental leave period in the calendar from 1 August 2026 to 31 December 2026. It's linked to the "Parental Leave" time off type. You edit the Parental Leave policy to add compensation proration, with an effective date of today (July 2026). The system detects that both the existing leave period and the new policy will apply proration rules to Julia's compensation. It flags it as a duplicate, and the conflict summary appears. To fix the duplication, delete Julia's existing leave period. The time off period (her time off on the Team calendar) remains. The new policy handles proration automatically for the entire period, since the leave starts after the effective date.
Note the following:
- When deleting existing leave periods, the associated time off period for each employee stays intact, and you can still see it in the calendar. The system only removes the existing leave period and its hardcoded rules.
- The new policy rules take over from the effective date.
Review edge cases
Before reviewing the edge cases below, check the list of existing leave periods attached to the pre-announcement email we sent on 14 July 2026. You only need to act on a leave period if you expect to edit it in the future. Leave periods that you don't need to change continue to run as before, with no action required.
For each leave period you do need to edit, check the list to identify which case applies:
- Open-ended leave periods: The end date in column E is empty, or the leave period is shown as open-ended in the team calendar.
- No linked time off type: The columns for linked absence ID, absence link, and time off type are empty. These are leave periods showing in the team calendar without a separate colored time off period.
- Edit any other leave periods: For example, if the date range for an existing leave period changes and the leave period does not fall in one of the above-mentioned categories.
Once you've identified the case, follow the matching resolution path below. The edge cases described below won't appear in the conflict summary when editing a time off policy and require a separate resolution path.
Open-ended leave periods with no end date
Existing open-ended leave periods don't have an end date. This means that the system considers them as still "running". Because editing existing leave periods is no longer possible, you can't close them by adding an end date. To manage these periods, you need to duplicate the relevant time off policy and assign it retroactively. This allows you to edit the employees' leaves via the time off period going forward.
Note:
Policy editing and assignment limits effective dates to the start of the previous period or later. Because of this restriction, the table below shows different steps for each scenario. You don't need to create separate policies for the same time off type—assign one policy to all affected employees with different effective dates.
| When the leave period started | Scenario | Resolution |
| January 2025 or later | Has a linked time off type and period | 1. Duplicate the policy linked to the time off type. In the duplicate, enter the relevant leave rules for status, compensation, and paid time off. Give duplicated policies specific names that indicate their use case (for example, "Parental Leave - Long-term leave transition"). 2. Assign the duplicated policy to the affected employee, effective 1 January 2025. 3. Ensure that the policy and its new leave rules fully cover the time off period. 4. Delete the existing leave period with the "leave period" label for affected employees and time frames. You can now edit employees' leaves via the time off period. |
| January 2025 or later | Does not have a linked time off type and period | 1. Duplicate the policy linked to the time off type. In the duplicate, enter the relevant leave rules for status, compensation, and paid time off. Give duplicated policies specific names that indicate their use case (for example, "Parental Leave - Long-term leave transition"). 2. Assign the duplicated policy to the affected employee, effective 1 January 2025. 3. Create a new open-ended time off period for each affected employee. Bulk import is recommended for multiple cases. 4. Delete the existing leave period with the "leave period" label for affected employees and time frames. You can now edit employees' leaves via the time off period. |
| Before January 2025 | Has a linked time off type and period | 1. Duplicate the policy linked to the time off type. In the duplicate, enter the relevant leave rules for status, compensation, and paid time off. Give duplicated policies specific names that indicate their use case (for example, "Parental Leave - Long-term leave transition"). 2. Assign the duplicated policy from the employee's hire date instead. If the hire date doesn't appear as an option, unassign the employee's current policy first, then assign the new one. The hire date becomes available once no policy is currently assigned. Refer to the table in the policy management article for the full list of "effective from" options. These options depend on entitlement and whether you're assigning a single employee or in bulk. 3. Delete the existing leave period with the "leave period" label for affected employees and time frames. You can now edit employees' leaves via the time off period. |
| Before January 2025 | Does not have a linked time off type or period | 1. Duplicate the policy linked to the time off type. In the duplicate, enter the relevant leave rules for status, compensation, and paid time off. Give duplicated policies specific names that indicate their use case (for example, "Parental Leave - Long-term leave transition"). 2. Assign the duplicated policy from the employee's hire date instead. If the hire date doesn't appear as an option, unassign the employee's current policy first, then assign the new one. The hire date becomes available once no policy is currently assigned. Refer to the table in the policy management article for the full list of "effective from" options. These options depend on entitlement and whether you're assigning a single employee or in bulk. 3. Create a new open-ended time off period for each affected employee. Bulk import is recommended for multiple cases. 4. Delete the existing leave period with the "leave period" label for affected employees and time frames. You can now edit employees' leaves via the time off period. |
To avoid issues, consolidate duplicate time off policies following the best practices in Managing duplicate policies.
Edit existing leave periods
You can no longer edit existing leave periods created in the old system. You might need to change the dates, for example, if the dates for a parental leave change. If so, make sure the employee has a time off period and a time off policy spanning the whole leave period. With the time off period, you can edit the dates. The policy applies the correct leave rules.
Time off policy rules only apply when a time off policy fully covers the time off period. If a policy with the new leave rules doesn't fully cover your time off periods, follow the steps for open-ended leave periods to edit the dates for your existing leave periods.
Leave periods without a linked time off type and period (with an end date)
If someone previously created a leave period without linking a time off period, it won't appear in the conflict summary when editing a time off policy. This is because no time off period exists for it to conflict with. If left in place, it continues running under the old system until its end date. This is fine if you don't need to edit the leave before it ends.
If you do need to make changes, resolve it as follows:
- Create a new time off policy with the required leave rules.
- Assign the time off policy to the employee effective from at least the day the leave period started to ensure the new leave rules apply.
- Create a new time off period for the employee from scratch. Use a bulk import if you have multiple cases to handle.
- Delete the existing leave period in the calendar with the label "leave period".
You don't track your employees' absences using Time off
If you don't use the Time off functionality in Personio to track your employees' absences, you have two options to manage leave periods in Personio going forward:
- Recommended: Set up time off types and time off policies. This way, the system can handle compensation, status, and entitlement changes for long-term leaves automatically.
- Adjust your employees' compensation, status, and entitlement manually for any new long-term leave.
For Option 1, we recommend taking our Academy course on how to set up time off in Personio. This covers the following:
1. Create a Time off type for each long-term leave category you manage. This might include, for example, parental leave, extended sick leave, sabbatical, etc.
2. Create a Time off policy for each type and configure the rules you need: compensation proration, employee status changes, and entitlement impact.
3. Assign the policy to employees and set necessary permissions, so everything's ready before you schedule anything new.
Once you've set up your policies, you can create new long-term leaves directly as time off periods in the employee's calendar.
Managing duplicate policies
During the transition, we suggest you create duplicate policies for retroactive assignment to your employees. To keep your policies organized and prevent managing duplicate policies in the future, choose one of these approaches:
Option A: Archive duplicate policies immediately
- Give duplicated policies specific names that indicate their use case (for example, "Parental Leave - Extended through December 2026").
- Archive these policies directly once you've finished the transition—that is, when you've assigned the newly created policy to all leave periods that you may want to edit going forward. Leave periods in the past that don't require editing can continue running under the old system as before without a policy update.
- Use this approach if you're confident you won't need to assign the policy again. Note that archived policies cannot be reused. If you later need to assign an archived policy to another employee, duplicate it and assign the new one to the employee.
Option B: Archive duplicate policies at year-end
- Give duplicated policies specific names that indicate their use case (for example, "Parental Leave - Long-term leave transition").
- Schedule a yearly cleanup and archive duplicate policies at the end of the year.
- Use this approach if you want to keep flexibility during the year in case you need to assign the policy to additional employees. This way, you maintain a cleaner policy structure going forward while avoiding the need to recreate or restore archived policies mid-year.
For both options, we recommend assigning your main time off policy to the employees again after their long-term leave ended, so you only have to manage one time off policy going forward.
FAQ
The Status field in the employee profile no longer lists leave periods and durations inline. Instead, it links to the Team calendar, which is now the single source of truth for all leave information. This means that the system now reports long-term leaves in the same way as regular time off periods. You have two options:
Option 1: Create a report in the Analytics area that filters for time off periods.
- Go to Analytics > Create report.
- Select the Time off periods template.
- Filter for your preferred timeframe and time off types relating to long-term leaves (for example, maternity leave, sick leave, etc.).
Option 2: Create a filtered view in the Team calendar. Use the filters to show the employees on leave during the current month.
Apply the following filters:
- Out of office contains Out of office this month
- Long-term leave time off types.
Click Custom and save the current view.
There is one exception where a manual correction may still be needed on your end: If payroll has already been processed for the affected period and there's a mismatch between the settings the old leave period applied and what the new policy applies for the same period. For example, the old leave period had compensation proration enabled by default, and the new policy doesn't.
Using Personio Payroll can affect whether you can configure the Compensation settings in your time off policies. This depends on how many of your legal entities use Personio Payroll:
- If none of your legal entities use Personio Payroll: You can configure the Compensation step as normal.
- If some, but not all, of your legal entities use Personio Payroll: You can still set up the Compensation step, but it won't take effect for employees under those Personio Payroll legal entities. You'll see a disclaimer explaining this. Their compensation continues to be handled through additional questions in the time off request flow instead.
- If all of your legal entities use Personio Payroll: The Compensation step isn't available to configure. The system calculates compensation proration automatically based on additional questions in the time off request flow.
Impact on paid time off and Employee status settings are not affected by Personio Payroll, since they don't impact payroll.
When both policy compensation settings and additional questions are active, they interact in specific ways depending on your configuration. Refer to the "DATEV - Compensation proration scenarios" section in this article for a detailed breakdown of all possible scenarios and how compensation is calculated in each case.