You can use employee filters to give your employees custom permissions to different areas in Personio.
Custom permissions are very tailored permissions where the employee can only access very specific information (example: the employee can only see the Personal data tab of the employees belonging to a specific team).
Note:
The My reports, Custom and All access areas do not include the employee's own data. If you want an employee to have access to their own data, you need to select the Own access area in addition to the relevant access area.
How do employee filters work?
Employee filters allow you to narrow the access given to role members to specific information of your employees.
When setting up employee filters, you will be able to select several employee attributes and the corresponding values for those attributes. All employees with matching (or non-matching) attribute values will be included in that selection of employees.
You can choose more than one value for a list of options attribute in a filter. This applies to both preset and custom attributes. For example, with the workplace attribute, you can select London and Munich. Personio then finds employees in either location. You can also select more than one value for other preset attributes like department, team, and legal entity.
Notes
▶︎ Tag attributes cannot be used as employee filters.
▶︎ If you use a custom attribute to create the filter, the access right to that specific area will be removed in case you ever delete the custom attribute.
Follow the next steps to set up employee filters:
- Select an attribute that you would like to filter by.
- Determine whether employees meeting that value shall be included in the filter (is) or excluded (is not).
- Enter the specific attribute value the filter should search for.
- Optional: click Add a filter to add an additional filter. This will narrow down even more the selection of the employees, as only the employees who fulfil all the filters will be included in the selection.
Examples:
▶︎ Workplace is London or Munich: The selection of employees will include all employees for whom the value London or Munich is stored in the attribute Workplace. You can use this filter, for example, to grant a role access to the work equipment of only a particular workplace location.
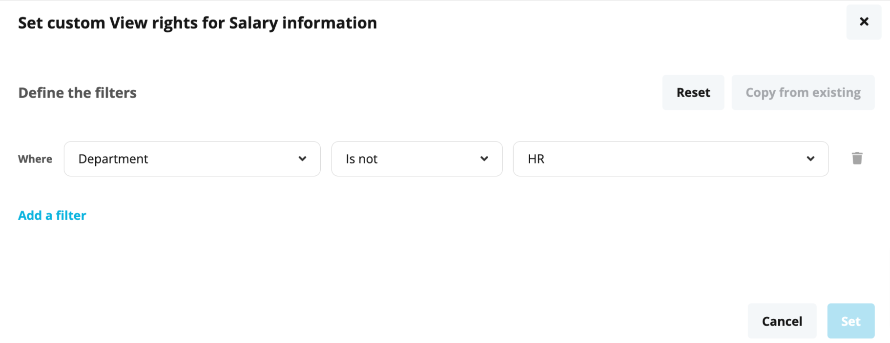
▶︎ Department is Marketing: The selection of employees will include all employees for whom the value Marketing is stored in the attribute Department. You can use this filter, for example, to grant a role access to the public employee profiles of only a particular department.
▶︎ Position is not CEO: The selection of employees will include all employees for whom the value in the attribute Position is not CEO. Use this filter, for example, to grant a role access to the public profiles of all employees, but not to that of the CEO.
▶︎ Department is Own: For attributes created in the List of options attribute type, it is also possible to select the value Own. If you assign this filter to a role that includes two employees, and Employee A is in the Sales department, and employee B in Customer Success, Employee A will have access to all employees in the Sales department, and Employee B to all in the Customer Success department.
Note
It is not possible to define multiple is filters for the same attribute in one custom right. For example, if we have a first filter Department is Marketing and a second filter Department is Sales, Personio would search for employees who are in both of these departments at the same time.
Where can employee filters be used?
Employee filters can be found within Settings > Organization > Roles & permissions.
For each employee role, you can use employee filters in three different ways:
- When setting up permissions for the different areas within Personio.
- When setting up permissions for the Team calendar.
- When setting up a reminder workflow.
Employee filters within the permissions settings
To create employee filters for the general permissions, follow these steps:
- Go to Settings.
- In the Organization section, click Roles & permissions.
- Click Custom.
- Click Add a Filter to set up a specific selection for an area of access.
- Alternatively, you can copy the filter ruleset from another custom filter within the employee role. You can do so by clicking Copy from existing. This allows you to quickly set up identical custom permissions across different access areas within the same employee role.
Employee filters within the calendar settings
To create employee filters for the Team calendar, follow these steps:
- Go to Settings.
- In the Organization section, click Roles & permissions.
- Click any role.
- Click Calendars.
- Select the calendar for which you would like to define custom viewing rights.
- To create an employee filter here, select Other.
- To now define a filter, click Edit custom rules and then click Add filter.